
Desserts
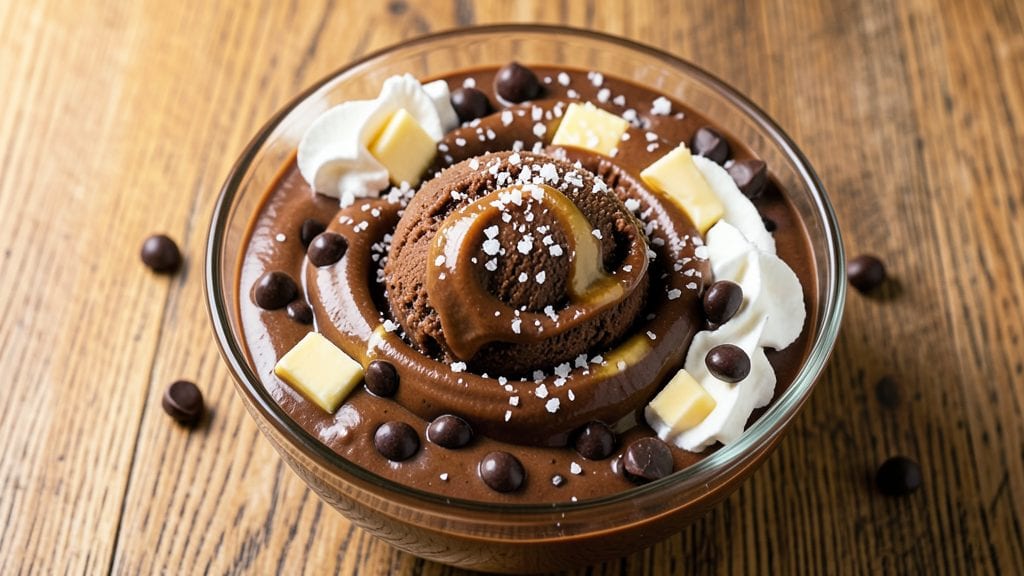
Creating no-churn chocolate ice cream that’s velvety smooth without an ice cream maker is simpler than you’d think. This recipe relies on a proven technique—heavy cream and sweetened condensed milk—that eliminates the need for churning while delivering that signature restaurant-quality texture.
The secret lies in the ganache swirls, which add depth and a luxurious finish without complicating the process.
With just five core ingredients and a 15-minute prep time, you’ll have a batch of ice cream that’s ready to freeze and enjoy in hours. No special equipment is required; simply mix, pour, and freeze, then swirl in the ganache before serving.
The result is a dessert that’s rich, creamy, and impossibly easy to customize with mix-ins like chocolate chips, crushed cookies, or a sprinkle of sea salt.
What sets this recipe apart is its foolproof method—no overrun, no ice crystals, just silky perfection every time. The ganache swirls melt into ribbons when scooped, creating a marbled effect that looks as impressive as it tastes.
Whether you’re feeding a crowd or treating yourself, this ice cream delivers professional results with minimal effort.
Perfect for meal prep or last-minute cravings, this recipe stays fresh for up to two weeks in the freezer. The best part? You can adapt it to dietary needs by swapping dairy for coconut cream or using vegan chocolate. Let’s make dessert effortless.
Ingredients for no churn chocolate ice cream
Five core ingredients transform into restaurant-quality chocolate ice cream without churning or special equipment.
| Ingredient | Amount | Notes |
|---|---|---|
| Heavy Whipping Cream 🥛 | 2 cups | Full-fat for optimal texture |
| Sweetened Condensed Milk 🥛 | 14 oz | Canned, not powdered version |
| Unsalted Butter 🧈 | ½ cup | Cold for easy handling |
| Dark Chocolate Chips 🍫 | 1 cup | 70% cocoa or higher |
| Vanilla Extract 🌿 | 1 tsp | Pure Madagascar preferred |
| Granulated Sugar 🍚 | ¼ cup | For ganache sweetness |
| Extra-Virgin Olive Oil 🫒 | 1 tbsp | For smooth ganache texture |
| Diamond Crystal Kosher Salt 🧂 | ¼ tsp | Fine grain for balance |
The heavy whipping cream and sweetened condensed milk form the base—full-fat cream is non-negotiable for that velvety texture. Store-brand canned condensed milk works perfectly, but avoid powdered versions. For the butter, unsalted is essential to control the final sweetness. The dark chocolate chips should be 70% cocoa or higher—look for brands like Ghirardelli or Lindt in the baking aisle. Vanilla extract matters here: pure Madagascar has deeper flavor than imitation extracts. If you're using a vanilla bean, scrape the seeds and add the pod to the ganache for extra aroma.
No heavy cream? Full-fat coconut cream works for a dairy-free version, though texture will differ slightly. Substituting powdered condensed milk requires adding 2 tablespoons water per 7 oz can, but the result won't be as rich. For the ganache, vegan dark chocolate (like Enjoy Life brand) keeps it plant-based. The olive oil in the ganache prevents graininess—don't skip it. If you prefer white chocolate swirls, use white chocolate chips and omit the cocoa powder, but reduce the sugar to 1/4 cup to avoid over-sweetness. The salt is crucial—it enhances all flavors, so don't omit it.
This ice cream freezes in 6-8 hours to a creamy consistency, then hardens slightly over 24 hours for easier scooping. Store in an airtight container with parchment between layers to prevent freezer burn. It keeps for up to 2 weeks in the freezer, though the texture improves after 48 hours as flavors meld. For meal prep, divide into portions and freeze flat—this prevents ice crystals. Let it sit at room temperature for 10 minutes before serving to achieve that perfect scoop.
Why You'll Love This Recipe
- No Mixing Needed: I swear by this trick—just dump the heavy cream, condensed milk, and butter into a bowl, stir once, then fold in melted chocolate. No ice cream maker, no waiting for churning, no stress. Honestly, the only effort is scraping the bowl clean afterward.
- Rich Without Guilt: That combo of sweetened condensed milk and dark chocolate chips? It’s like dessert had a flavor upgrade. The vanilla extract ties it all together so smoothly—creamy, deep, and just sweet enough to satisfy a craving without feeling heavy.
- Party in a Bowl: Between us, this is my go-to for last-minute gatherings. Freeze it ahead, and you’ve got a crowd-pleaser that needs zero effort to serve. Kids love picking out the chocolate chunks, and adults? They won’t even notice you didn’t buy it pre-made.
- Leftovers That Last: I make a double batch every time because it keeps perfectly for weeks—no freezer burn, no weird textures. Plus, the ingredients are cheap staples, so you’re not breaking the bank for a treat that tastes like it cost a fortune. (Yes, even on a Tuesday night.)
Step-by-step instructions for no-churn chocolate ice cream
Here's how to create velvety chocolate ice cream with perfect ganache swirls—no ice cream maker required.
Prepare the Chocolate Ganache
In a medium heatproof bowl, combine the 1 cup dark chocolate chips and the 14 oz sweetened condensed milk. Place the bowl over a pot of simmering water, ensuring the bottom of the bowl doesn't touch the water. Stir gently until the chocolate and condensed milk melt completely, forming a smooth, glossy ganache. The mixture should coat the back of a spoon and have a rich, fudgy texture.
Remove the bowl from the heat and stir in the 1 tbsp extra-virgin olive oil and the 0.25 cup granulated sugar. Let the ganache cool to room temperature, stirring occasionally, until it reaches a thick but pourable consistency. This ensures it swirls beautifully without being too runny or too stiff when folded into the ice cream base later. The ganache should be cool enough to handle but still warm to the touch.
Whip the Cream and Incorporate Flavors
In a separate large bowl, combine the 2 cups heavy whipping cream, 0.5 cup unsalted butter (cut into small cubes), 1 tsp vanilla extract, and 0.25 tsp diamond crystal kosher salt. Using an electric mixer, whip the mixture on medium-high speed until soft peaks form. The butter should be fully incorporated, and the cream should hold its shape when the whisk is lifted. This step is critical—overwhipping can turn the cream grainy, while underwhipping won’t provide enough structure for the ice cream.
Once the cream reaches stiff peaks, gently fold in the cooled ganache using a spatula. Start by adding about half the ganache and mixing until fully combined, then add the remaining ganache. Be careful not to overmix—just enough to create marbled swirls. The final mixture should be thick, creamy, and ready for freezing. Taste a small spoonful to ensure the chocolate flavor is balanced and the sweetness is just right.
Freeze for Creamy Perfection
Transfer the mixture to a loaf pan or airtight container, smoothing the top with a spatula. Cover the pan tightly with plastic wrap, pressing it directly onto the surface of the ice cream to prevent ice crystals from forming. Place the pan in the freezer and freeze for 4-6 hours, or until completely firm. The ice cream should be solid enough to scoop easily but still creamy, not icy.
For best results, let the ice cream sit at room temperature for 5-10 minutes before serving. This allows it to soften slightly, making it easier to scoop and enhancing its velvety texture. If the ice cream freezes too long, you can briefly soften it in the refrigerator for 10-15 minutes before serving. Serve immediately to enjoy the smooth, rich chocolate flavor and the perfect balance of sweetness and depth.
Serve with Confidence
Use a spoon or ice cream scoop to serve the ice cream into bowls or cones. The ganache swirls should be visible throughout, adding visual appeal and bursts of chocolate flavor with every bite. Garnish with a sprinkle of cocoa powder or a few extra chocolate chips for added texture and presentation. The final product should be rich, creamy, and perfectly balanced—no graininess or iciness in sight.
This no-churn method guarantees a silky-smooth texture without the need for an ice cream maker. The key lies in the ganache preparation and proper whipping of the cream, ensuring a luxurious dessert every time. Enjoy your homemade chocolate ice cream while it’s still cold and creamy!
Pro Tips For Making No Churn Chocolate Ice Cream
- Chill the Mix First: Mixing the heavy cream, condensed milk, and butter while still cold is non-negotiable—room temperature fat behaves like a stubborn teenager. Grab your bowl from the fridge, dump in the ingredients, and stir just until the butter melts. This keeps the texture smooth and prevents a greasy, separated mess later.
- Melt Butter Slowly: I used to dump the butter in and microwave it fast, only to end up with a weird, grainy texture. Instead, cut the butter into tiny cubes (the size of your pinky nail) and let them melt right into the warm condensed milk—no extra heat needed. This way, the fat distributes evenly without scrambling the cream.
- Skip the Overmixing: Once you fold in the chocolate chips, stop stirring after 10 seconds. I learned this after making a batch that turned into a thick, clumpy pudding—turns out, overworking the mix breaks down the cream’s structure. Let the chips melt naturally; they’ll sink and distribute on their own.
- Use Room-Temp Cream: Cold heavy cream is a no-go—it won’t whip properly, and your ice cream will taste flat. Take the cream out of the fridge 30 minutes before mixing (yes, even if you’re impatient like me). If you’re in a rush, run the chilled can under warm water for 2 minutes. The goal? Cream that’s cool to the touch but not icy.
Storing and reheating your leftovers
Freezer Storage Tips
Store your no-churn chocolate ice cream in an airtight container with parchment paper between layers to prevent freezer burn. I use glass loaf pans lined with plastic wrap pressed directly onto the surface—this creates a smooth barrier that keeps ice crystals at bay.
The ice cream freezes to a creamy consistency in 6-8 hours, then hardens slightly over 24 hours for easier scooping. 🥶
Portioning for Meal Prep
Divide the ice cream into portions before freezing for grab-and-go convenience. I recommend 1-cup silicone molds or small airtight containers—they freeze faster and prevent ice crystals from forming between layers.
For a restaurant-style presentation, freeze in a rectangular dish and slice into squares before serving. Label containers with dates to track freshness. ⏰
Thawing for Smooth Scoops
Let the ice cream sit at room temperature for 5-10 minutes before serving to soften slightly—this prevents scooping struggles and enhances creaminess. If fully frozen, transfer the container to the refrigerator for 10-15 minutes to thaw just enough for a smooth texture.
Never microwave, as this creates a grainy, melted mess. A chilled spoon helps scoop if needed. ✨
Reviving Grainy Texture
If your ice cream develops ice crystals, don’t toss it! Place the container in a bowl of warm water (never hot) for 5-10 minutes to gently thaw. Stir vigorously with a spatula to redistribute the fats, then refreeze in a fresh container.
The texture will improve, though it may not be as silky as freshly made. This trick works best for ice cream stored beyond 2 weeks. 🔄
Long-Term Freshness
For maximum freshness, store your ice cream in the coldest part of your freezer (usually the back bottom shelf). The olive oil in the ganache helps preserve moisture, but adding a thin layer of plastic wrap on top before sealing the container adds an extra barrier against freezer burn.
Properly stored, this recipe stays creamy for up to 2 weeks—though I find it’s best enjoyed within 10 days for peak texture. 💫
Serving After Thawing
If your ice cream has softened too much, place it back in the freezer for 10-15 minutes to firm up before serving. For a hot weather hack, chill your serving bowls in the freezer for 5 minutes before adding the ice cream—this keeps it scoopable longer.
Garnish with crushed peppermint or sea salt flakes to elevate the flavors and add a sophisticated touch. 🍫
Nutrition facts
Frequently asked questions
Why does this recipe work without an ice cream maker?
The magic lies in the combination of heavy cream and sweetened condensed milk, which naturally emulsify when whipped and frozen. The butter adds fat content that prevents ice crystals, while the ganache swirls create air pockets that mimic churned texture. This method has been used for decades in restaurants to create professional-quality desserts at home.
Can I make this recipe with coconut milk instead of dairy?
Yes! For a dairy-free version, replace the heavy cream with 2 cups full-fat coconut cream (refrigerated overnight) and use vegan dark chocolate for the ganache. The texture will be slightly denser but still delicious. Keep in mind coconut milk has a natural sweetness, so you may want to reduce the granulated sugar to 1/4 cup in the ganache.
What if my ice cream gets grainy after freezing?
Graininess usually happens from ice crystals forming when air gets in during freezing. To fix it, place the container in a bowl of warm water (not hot) for 5-10 minutes to gently thaw, then stir vigorously with a spatula. The motion redistributes the fats, restoring creaminess. For prevention, always press plastic wrap directly onto the surface before freezing.
How do I get those pretty swirls in my ice cream?
The key is folding the ganache gently after the cream reaches soft peaks. Use a spatula to create marbled patterns by dragging it through the mixture in a figure-8 motion. Work quickly but carefully—overmixing will break the swirls. For extra visual appeal, let the ice cream sit at room temperature for 10 minutes before serving so the ganache melts slightly when scooped.
Can I add mix-ins like nuts or cookies?
Fold in 1/2 cup chopped nuts, crushed cookies, or caramel drizzle after mixing the ganache but before freezing. For best results, use mix-ins that stay firm at freezing temperatures (like toasted nuts or shortbread cookies). Avoid anything too soft, like fresh fruit, which can make the texture icy.