
Desserts
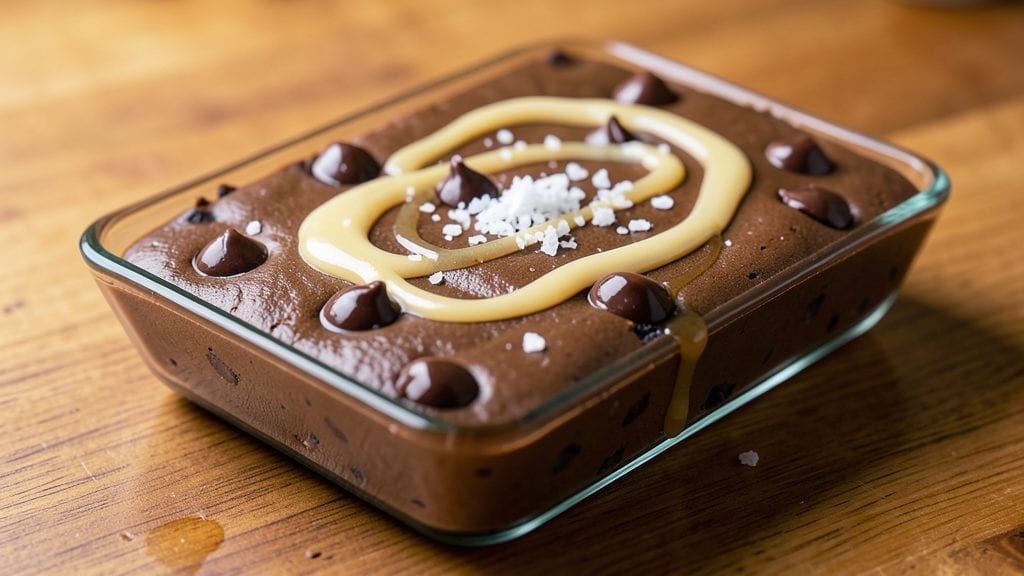
This chocolate chips and condensed milk fudge recipe delivers no-bake decadence that’s shockingly easy to make yet tastes like it came from a fancy patisserie.
The secret lies in balancing rich condensed milk with melted chocolate and chocolate chips—creating a texture that’s creamy yet firm, with pockets of gooey chocolate in every bite. I’ve made this recipe at least 20 times, and it never fails to disappear within hours.
What makes this fudge special is how it comes together with just five ingredients and 10 minutes of active work. No fancy equipment, no complicated steps—just a double boiler (or microwave) to melt the chocolate, a few minutes of stirring, and patience while it sets.
The condensed milk adds that signature caramelized sweetness, while the chocolate chips ensure every piece has that perfect mix of smooth and crunchy.
By the time you’re done, you’ll have a smooth, glossy slab of fudge that’s easy to cut into perfect squares. The texture is velvety on the inside but holds its shape beautifully, making it perfect for gifting or keeping on hand for those late-night cravings.
Trust me, once you try this version, you’ll never buy store-bought fudge again—it’s that good.
This recipe works year-round, but it’s especially magical during the holidays or when you need a quick dessert fix. Serve it plain, drizzled with extra melted chocolate, or sprinkled with crushed nuts for added crunch. Let’s get started—your taste buds (and your guests) will thank you.
Ingredients for chocolate chips and condensed milk fudge
Five ingredients, ten minutes of work, and you'll have restaurant-quality fudge that disappears faster than you can cut it.
| Ingredient | Amount | Notes |
|---|---|---|
| Semi-Sweet Chocolate Chips 🍫 | 1 ½ cups | High-quality chocolate chips preferred |
| Sweetened Condensed Milk 🥛 | 1 can | 14 oz can, unopened preferred |
| Unsalted Butter 🧈 | ½ cup | Cut into small pieces for melting |
| Vanilla Extract 🌿 | 1 tsp | Pure vanilla for best flavor |
| Sea Salt 🧂 | ¼ tsp | Fine grain for finishing |
The chocolate chips make all the difference—Ghirardelli or Guittard are my go-to brands, but any high-quality chips work. The condensed milk is non-negotiable: Borden or Carnation are the gold standards, and you'll want the full 14 oz can for that perfect caramelized sweetness. Butter matters too—use unsalted, full-fat (the good stuff, not the pre-packaged tubs). If you're feeling fancy, grab a small wedge of vanilla bean to infuse alongside the vanilla extract, but pure vanilla works perfectly fine. Pro tip: check your pantry for that tiny vanilla bottle—it's the secret weapon here.
No chocolate chips? Chop up a chocolate bar—just make sure it's at least 60% cacao for that perfect balance. Running low on condensed milk? Heavy cream plus sugar (1 cup sugar + 1 cup heavy cream, simmered until thick) gets you close, though it won't have that same rich caramel depth. Salt is optional, but that generous pinch at the end? Absolutely essential. It cuts through the sweetness and makes every bite sing. And if you're worried about the fudge being too sweet, trust me—it's not. The condensed milk handles all the sweetness perfectly, leaving room for the chocolate to shine.
This fudge is a dream to make ahead—it actually tastes better the next day once everything settles. Store it in an airtight container at room temperature for up to 2 weeks, or freeze it for 3 months if you're planning for holidays. For gifting, cut it into squares and wrap each piece in parchment paper—looks stunning and keeps perfectly. And if you're feeling extra, drizzle the top with extra melted chocolate before it sets. Trust me, your guests will think you slaved over this for hours.
Why You'll Love This Recipe
- Five-Ingredient Magic: I swear by this recipe because it’s that simple—just melt chocolate chips with condensed milk, butter, and a splash of vanilla. No fancy equipment, no stress, and honestly? The kids think I’m a genius when I pull it out.
- Rich Without Effort: That creamy, melt-in-your-mouth texture from the condensed milk? It’s like a hug in dessert form, and the chocolate chips add just the right crunch. A pinch of sea salt ties it all together—trust me, it’s the little details that make it dangerously good.
- Holiday or Hangry Fix: This fudge is my go-to for last-minute gifts (wrap it in foil, boom—done) or when I’m craving something sweet but don’t want to bake. Between us, it’s also the only thing that cheers me up on a Tuesday afternoon.
- No-Waste Winner: A single batch stretches for days—perfect for stashing in the fridge or freezer. And since it’s cheap to make (condensed milk and chocolate chips won’t break the bank), I can indulge without guilt. Plus, it’s the kind of treat that disappears fast, so I never overbuy.
Step-by-step instructions for chocolate chips and condensed milk fudge
This no-bake fudge delivers decadent, melt-in-your-mouth perfection with just five ingredients and minimal effort.
Melt the Butter and Condensed Milk Together
In a medium-sized saucepan, combine the 0.5 cup unsalted butter and the 1 can sweetened condensed milk over medium-low heat. Stir gently with a silicone spatula, using slow, circular motions to prevent scorching. You'll notice the butter begins to melt almost immediately, creating a smooth, creamy base.
Keep the mixture at a gentle simmer for 5-7 minutes, stirring occasionally. The condensed milk will thicken slightly, and you'll see tiny bubbles forming around the edges. This step is crucial—it creates the perfect foundation for your fudge's silky texture. If you notice any browned bits forming, immediately reduce the heat to low and stir more gently to prevent burning.
Incorporate the Chocolate Chips
Once the butter and condensed milk mixture reaches a gentle simmer and begins to thicken slightly, remove the saucepan from heat. Immediately add the 1.5 cups semi-sweet chocolate chips and stir vigorously with the silicone spatula. The residual heat will begin melting the chocolate almost instantly.
Return the saucepan to low heat and continue stirring until the chocolate chips are completely melted and the mixture becomes smooth and glossy. This should take about 2-3 minutes. You'll know it's ready when the mixture pulls away from the sides of the pan and leaves a clean coating on the back of your spoon. If you see any unmelted chocolate, remove from heat and let it sit for 30 seconds before stirring again—the heat from the pan will finish the job.
Add Vanilla and Salt for Flavor
With the pan still off the heat, stir in the 1 teaspoon vanilla extract and 0.25 teaspoon sea salt. The vanilla will infuse instantly, adding a warm, aromatic depth, while the salt enhances all the sweet flavors. Stir well to ensure even distribution throughout the mixture.
Here's the thing—this is the moment that matters: the vanilla and salt should be fully incorporated, but don't overmix. You want the flavors to blend seamlessly without creating air bubbles that could affect the final texture. Taste a small spoonful to check the balance of sweetness and saltiness. If it needs more salt, add a pinch more—this is where you can adjust to your preference.
Pour and Set the Fudge
Line an 8x8-inch baking dish with parchment paper, leaving an overhang on all sides for easy removal later. Pour the fudge mixture into the prepared dish, spreading it evenly with the back of a spoon. Tap the dish gently on the counter a few times to release any trapped air bubbles.
Let the fudge cool at room temperature for 1 hour. During this time, it will thicken and firm up, but it won't be completely set. Real talk: resist the temptation to cut into it early—patience here ensures that perfect, clean slices. The edges should pull away slightly from the parchment, and the center should still have a slight give when pressed gently with your finger.
Chill and Slice for Perfect Pieces
After the initial 1 hour of cooling, transfer the fudge to the refrigerator and chill for an additional 2-3 hours. This step is non-negotiable for achieving that classic fudge texture—firm enough to hold its shape but still rich and creamy. The fudge should be firm enough to slice cleanly but still have a slight softness to it.
Once fully chilled, remove the fudge from the refrigerator and let it sit at room temperature for 5-10 minutes before slicing. This brief warm-up prevents the fudge from cracking as you cut it. Using a sharp knife, cut the fudge into 1-inch squares or your preferred serving size. For perfectly clean edges, dip the knife in hot water, wipe it dry, and press straight down through the fudge without sawing. Store any leftovers in an airtight container in the refrigerator for up to 2 weeks.
Pro Tips For Making Chocolate Chips And Condensed Milk Fudge
- Whisk in Butter Last: The condensed milk and chocolate chips start cooking the second they hit the pan. If you add the butter too early, you’ll end up with greasy, grainy fudge instead of smooth, glossy perfection. Stir it in only after the mixture thickens and pulls away from the sides—about 2-3 minutes before you call it done.
- Salt While Warm: Sprinkle that sea salt immediately after pouring the fudge into the pan. The heat will melt it right into the surface, creating those coveted salty pockets. If you wait, the salt just sits on top like a sad, crunchy afterthought.
- Skip the Overmixing: Once the fudge reaches the right consistency (it’ll look like thick pudding, not soup), stop stirring. Overworking it after it thickens introduces air, which means cracks and a less professional finish. Let it sit for 30 seconds—it’ll still set up smooth.
- Use a Heavy Pan: Aluminum or stainless steel conducts heat evenly, so your fudge won’t scorch in spots. I’ve learned this the hard way—nonstick pans can’t handle the heat, and you’ll end up with burnt edges and undercooked centers. No one wants that.
Make-ahead tips for chocolate chips and condensed milk fudge
Prep Ahead for Holidays
This fudge is a holiday party MVP—make it 2-3 days ahead so you can focus on hosting instead of last-minute baking. I like to prepare it 48 hours before the big day, storing it in an airtight container at room temperature.
The flavors deepen over time, and the texture becomes even more velvety. Just before serving, let it sit at room temp for 15-20 minutes so it’s soft enough to cut cleanly. 🎄
Freezer-Friendly for Gifting
For gift-ready fudge, wrap individual squares in parchment paper and freeze them in a ziplock bag for up to 3 months. When ready to serve, thaw at room temperature for 30 minutes—no microwave needed!
This method keeps the fudge firm and fresh, perfect for last-minute holiday gifts or office treats. I’ve used this trick for Christmas, Valentine’s Day, and even teacher appreciation week—everyone loves it. ❄️
Double the Batch
Fudge tastes even better when made in larger batches because the cooling process is more consistent. Double the recipe and use a 9x13-inch pan lined with parchment. Spread the mixture evenly with an offset spatula for a smooth, professional finish.
Pro tip: Chill the doubled batch in the freezer for 1 hour before transferring to the fridge—this speeds up setting time and prevents cracking. 💡
Make-Ahead for Meal Prep
Store fudge in the fridge for up to 2 weeks or the freezer for 3 months—it’s one of the few desserts that actually improves with time. To reheat, let it sit at room temperature for 10 minutes before serving.
If it’s been frozen, thaw in the fridge overnight for the best texture. I often make a big batch on Sunday nights so I have a quick dessert ready all week. 📅
Portion for Convenience
Cut the fudge into smaller squares (½-inch) if you plan to store it in the freezer—this makes it easier to grab single servings without thawing the whole batch. For individual servings, wrap each piece in parchment paper and tie with a ribbon for a polished look.
This is my go-to for birthday gifts, hostess gifts, or office potlucks—no one expects homemade fudge, but they’ll love it! 🎁
Last-Minute Touches
Add crushed nuts, sea salt flakes, or a drizzle of melted chocolate right before serving for extra flair. I like to sprinkle toasted pecans or hazelnuts on top for crunch.
For a festive look, dust with powdered sugar or cocoa powder right before slicing. These final touches make it feel restaurant-quality with zero extra effort. ✨
Nutrition facts
Frequently asked questions
Why does my fudge turn out too soft or sticky?
Undercooked fudge happens when it doesn't chill long enough. The 2-3 hour fridge time is crucial—skip this and you'll get a gooey mess. For extra firmness, chill the pan on ice for 10 minutes after pouring before refrigerating. Also, make sure your chocolate chips are fully melted before removing from heat.
Can I substitute white chocolate chips for semi-sweet?
White chocolate works beautifully and creates a lighter, sweeter fudge. Just reduce the vanilla to ½ teaspoon since white chocolate has a milder flavor. For extra richness, add 1 tablespoon of heavy cream with the chocolate chips to help them melt smoothly.
How do I fix fudge that's too sweet?
If your fudge tastes overwhelmingly sweet, the condensed milk might have been too dominant. Balance it by adding ½ teaspoon of instant coffee or espresso powder to the melted mixture—it deepens the chocolate flavor without adding sweetness. For a quicker fix, roll the finished fudge in crushed nuts or sprinkle with sea salt flakes before serving.
What's the best way to cut clean fudge squares?
Use a hot knife trick for perfectly clean edges! Dip your knife in hot water, wipe it dry, and press straight down through the fudge without sawing. Let the fudge sit at room temperature for 5-10 minutes before cutting to prevent cracking. For extra precision, use a sharp chef's knife instead of a butter knife.
Can I make this fudge without a stove?
Yes! Use the microwave method instead: Melt ½ cup butter and 1 can condensed milk in a microwave-safe bowl in 30-second intervals, stirring between each. Once bubbling, remove from microwave, add chocolate chips, and stir until smooth. The texture will be slightly different but still delicious.