Desserts
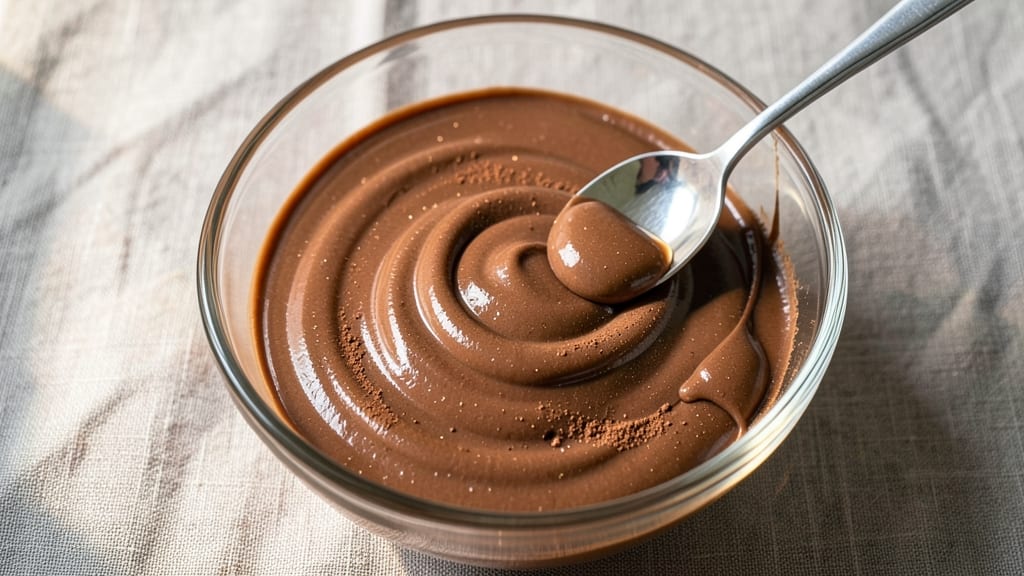
Creating a Hershey's cocoa chocolate icing that's silky smooth and perfect for drizzling over cakes or cupcakes doesn't require any special skills—just the right balance of ingredients and technique. This recipe delivers a rich, velvety finish that elevates any dessert with minimal effort.
The secret lies in combining powdered sugar, butter, and cocoa powder in precise proportions to achieve that signature Hershey's flavor without graininess.
With just five simple ingredients and 10 minutes of active time, you'll have a glossy, spreadable icing ready to transform your baked goods into showstoppers. The key is warming the butter and milk slightly before mixing, which ensures everything blends seamlessly into a smooth, pipeable consistency.
This method works for both traditional and vegan adaptations, making it versatile for any dietary need.
What you'll end up with is a rich, glossy icing that clings beautifully to cakes, cupcakes, or cookies, adding that professional bakery finish. The cocoa powder provides deep chocolate flavor, while the butter and powdered sugar create a creamy texture that's neither too sweet nor too heavy.
It's the kind of icing that makes even the simplest dessert feel like a special occasion treat.
The best part? This recipe scales perfectly for small batches or large decorating projects, and leftovers keep well in the fridge for up to a week. Whether you're frosting a layer cake or adding decorative drizzles to cupcakes, this icing delivers consistent, restaurant-quality results every time.
Let's get started with the ingredients you already have in your pantry.
Ingredients for hershey's cocoa chocolate icing
Five pantry staples transform into a velvety, restaurant-quality chocolate icing perfect for cakes and cupcakes.
| Ingredient | Amount | Notes |
|---|---|---|
| Unsalted Butter 🧈 | ½ cup | Cold, cubed for easier mixing |
| Hershey's Cocoa Powder 🍫 | ½ cup | Natural, unsweetened variety |
| Powdered Sugar 🍚 | 3 cups | Sifted for smooth texture |
| Whole Milk 🥛 | ¼ cup | Warmed to room temperature |
| Vanilla Extract 🌿 | 1 tsp | Pure, high-quality preferred |
The cocoa powder is the heart of this recipe, so Hershey's Natural Cocoa is ideal—it delivers that signature chocolate depth without added sugar. For the butter, European-style unsalted (like Plugrá) creates a richer, smoother finish than standard American butter. Powdered sugar should be sifted before measuring to prevent graininess, and Domino brand is a reliable choice for consistent results. The milk needs to be warmed just enough to melt the butter completely—microwave for 30 seconds or heat in a small saucepan until steaming but not boiling. Vanilla extract can be swapped for vanilla bean paste if you prefer a more intense flavor.
No Hershey's cocoa powder? Dutch-process cocoa works but may require an extra splash of milk to compensate for its lower fat content. Substituting butter with vegan butter or coconut oil creates a dairy-free version, though texture will be slightly firmer. For powdered sugar alternatives, confectioners' sugar is a direct swap, but avoid granulated sugar—it won't dissolve properly. If you're avoiding dairy, almond milk or oat milk can replace whole milk, though the icing may be slightly thinner. The vanilla extract is non-negotiable for flavor, but vanilla sugar at half the amount works in a pinch—just sift it with the powdered sugar first.
This icing thickens as it cools, so reheat gently with 10 seconds in the microwave if it becomes too stiff to drizzle. Store in an airtight container in the fridge for up to 1 week, or freeze for 3 months in a sealed jar. For a glossy finish, brush cakes with a thin layer of milk or simple syrup before adding the icing. The recipe doubles easily—just scale all ingredients proportionally—for larger decorating projects. Always let the icing come to room temperature before using for the smoothest application.
Why You'll Love This Recipe
- Five-Ingredient Magic: I swear by this combo—just butter, cocoa, sugar, milk, and vanilla. No fancy tools, no stress, just melt, whisk, and boom, you’ve got that velvety, rich icing ready in minutes.
- Rich Without the Fuss: That first spoonful? Pure chocolate bliss, but it’s not heavy or bitter. The Hershey’s cocoa gives it that classic, comforting depth while the milk keeps it smooth and luscious—no weird aftertaste here.
- Cake or Cookie Hero: Drizzle it over cupcakes, slather it on brownies, or use it to frost a sheet cake. It’s my go-to for birthdays, potlucks, or even sneaking extra chocolate into my kid’s lunchbox (they’ll never know it’s “healthy”).
- Budget-Friendly Luxury: A single batch costs pennies but tastes like a gourmet bakery treat. Plus, any leftovers? Freeze them—just thaw and re-whisk for next time. Zero waste, all flavor.
Step-by-step instructions for Hershey's cocoa chocolate icing
Master this classic icing technique for flawless, silky results every time.
Prepare the Base Ingredients
In a medium heatproof bowl, combine the 0.5 cup unsalted butter and 0.5 cup Hershey's cocoa powder. Place this bowl over a saucepan of simmering water, ensuring the bottom of the bowl doesn't touch the water. This double boiler method creates a smooth, lump-free base by gently melting the butter while preventing the cocoa from seizing.
Stir the mixture constantly with a silicone spatula until the butter is completely melted and the cocoa is fully incorporated—this should take about 3-4 minutes. The mixture should be smooth and glossy, with no visible butter chunks. Remove the bowl from the heat and let it cool slightly for 2-3 minutes while you prepare the remaining ingredients. This cooling step prevents the powdered sugar from clumping when added later.
Whisk in Powdered Sugar and Milk
Add the 3 cups powdered sugar to the melted butter-cocoa mixture. Using an electric mixer on medium speed, beat for 2-3 minutes until the sugar is fully incorporated and the mixture begins to lighten in color. This gradual incorporation prevents sugar from settling at the bottom and ensures an even consistency throughout.
With the mixer still running, slowly pour in the 0.25 cup warmed whole milk through the feed tube, if available, or in a thin stream while mixing. Continue beating for another 2-3 minutes until the icing reaches a smooth, spreadable consistency. The mixture should coat the back of a spoon but still maintain a thick, drizzle-like texture. If the icing is too thick, add 1 tablespoon milk at a time until you reach the desired consistency.
Incorporate Vanilla and Final Adjustments
Add the 1 teaspoon vanilla extract and mix on low speed for 30 seconds to evenly distribute the flavor. The vanilla enhances the chocolate's depth and adds a subtle sweetness that balances the richness. Taste the icing at this stage—if it needs more sweetness, add 1-2 tablespoons powdered sugar at a time until properly sweetened. For a deeper chocolate flavor, you can add an additional 1 tablespoon cocoa powder, but proceed with caution to avoid altering the texture.
Transfer the icing to a clean mixing bowl and use the mixer to whip it for 1-2 minutes on medium-high speed. This final step incorporates air, creating a lighter, more spreadable consistency perfect for drizzling or piping. The icing should now have a glossy sheen and hold its shape when drizzled, but still flow smoothly when warmed slightly.
Use Immediately or Store Properly
For immediate use, pour the icing into a piping bag fitted with a small round tip or use a squeeze bottle for drizzling. If you're decorating warm cakes or cupcakes, gently warm the icing in the microwave for 10-15 seconds to make it more fluid. The icing should flow easily but still cling to the sides of the piping bag or bottle. Apply to cooled baked goods, working quickly to prevent the icing from setting too soon.
If you need to store the icing, transfer it to an airtight container and refrigerate for up to 1 week. Before using, let it sit at room temperature for 10-15 minutes and whisk or microwave briefly to restore its smooth, spreadable texture. Avoid reheating for extended periods, as this can cause the icing to separate or become grainy.
Pro Tips For Making Hershey'S Cocoa Chocolate Icing
- Melt Butter Slowly: I learned this the hard way—dumping cold butter into hot milk makes lumps that never fully dissolve. Instead, melt the butter first (about 2 minutes in a microwave, stirring once) before mixing it into the warm milk. That way, the cocoa powder blends in like silk, not grit.
- Sift the Cocoa: Hershey’s cocoa powder clumps like a teenager’s laundry pile if you don’t sift it. Skip this, and your icing will taste dull and uneven. Use a fine-mesh sieve or just shake the box over a bowl—it takes 10 seconds and makes a real difference.
- Add Milk Gradually: Pouring all the milk at once turns your icing into a sad, runny mess. Start with ¼ cup, mix well, then add more until it’s smooth and spreadable. You can always thicken it later with more powdered sugar, but you can’t un-sauce a watery disaster.
- Use Cold Vanilla: My grandmother swore by this, and she was right: refrigerate your vanilla extract for 10 minutes before adding it. Cold vanilla infuses more evenly and doesn’t overpower the chocolate. (Yes, even if you’re impatient like me.)
Regional styles of this hershey's cocoa chocolate icing
Southern Sweet Style
In the South, this icing gets a touch of warmth with 1 teaspoon cinnamon and ½ teaspoon espresso powder—just whisk them into the finished mixture. The cinnamon adds a cozy spice that pairs perfectly with Southern classics like peach cobbler or pound cakes.
I like to drizzle it over mini pecan pies for a festive holiday touch. The espresso powder deepens the chocolate flavor without overpowering it. 🌶️
New England Spiced Twist
Up north, they take their icing seriously by adding ½ teaspoon ground nutmeg and ¼ teaspoon cloves for a rich, aromatic depth. This variation works beautifully on apple cakes or pumpkin bread, giving it that classic New England bakery feel.
I’ve even used it as a filling for chocolate cream puffs—the spices cut through the sweetness perfectly. Store-bought McCormick’s spices work great for consistent results.
Midwest Buttery Richness
The Midwest loves their icing extra rich, so they often replace ¼ cup of the powdered sugar with ¼ cup corn syrup for a glossier, stickier finish. This version clings beautifully to whoopie pies or sugar cookies, making it a favorite for state fairs.
I’ve also seen it used as a glaze for chocolate-dipped pretzels—the buttery richness balances the salt perfectly. For an extra touch, add 1 teaspoon lemon zest right before serving.
Pacific Northwest Vegan Adaptation
Out west, they’ve mastered the vegan version by swapping butter for ½ cup coconut oil (solid) and milk for ¼ cup almond milk. The texture stays smooth, and the flavor remains rich. I like adding 1 teaspoon maple syrup to enhance the natural sweetness.
This works wonderfully on vegan brownies or oatmeal cookies, and the coconut oil gives it a subtle tropical note that pairs beautifully with raspberry compote. 🌿
Texas-Style Chocolate Drizzle
In Texas, they take their icing to the next level by adding ¼ cup heavy cream and 1 tablespoon honey for a silky, ultra-smooth drizzle. This version is perfect for churros or beignets, where the extra creaminess makes every bite decadent.
I’ve even used it as a filling for chocolate-covered strawberries—the honey adds a caramel-like depth that’s irresistible. For a smoky twist, add ¼ teaspoon smoked sea salt right before serving.
Florida Citrus Infusion
Florida’s sunny climate inspires a bright, citrusy take on this icing. Add 1 tablespoon orange zest and 1 teaspoon orange extract for a zesty kick that cuts through the richness. This version is perfect for key lime pies or citrus cakes, giving them a professional bakery finish.
I’ve also used it as a glaze for chocolate-covered oranges—the citrus and chocolate combo is pure magic. Freshly grated zest works best, but Florida’s Natural bottled zest is a great backup.
Nutrition facts
Frequently asked questions
Why does my cocoa icing turn grainy?
Graininess usually happens when powdered sugar isn't sifted or when the icing cools too quickly. Always sift your sugar and let the icing sit at room temperature before using. If it happens, whisk in 1 tablespoon warm milk at a time until smooth. For extra insurance, strain the finished icing through a fine-mesh sieve before drizzling.
Can I make this icing without a mixer?
Use a sturdy whisk and strong arm. Combine the melted butter and cocoa first, then gradually whisk in the powdered sugar until fully incorporated. Add the milk slowly while whisking vigorously. It'll take 5-7 minutes of steady work, but you'll get the same smooth results. The key is patience and consistent whisking.
How do I fix icing that's too thick or too thin?
For thick icing, add 1 tablespoon milk at a time while mixing until it reaches a smooth, drizzle consistency. If it's too thin, whisk in 1 tablespoon powdered sugar until it thickens. For best results, let the icing rest for 10 minutes after mixing—it naturally thickens as it cools. Always test consistency by spooning some onto a plate.
What's the best way to store leftover icing?
Transfer to an airtight container and refrigerate for up to 1 week. Before using, let it sit at room temperature for 10-15 minutes and whisk or microwave for 10 seconds to restore smoothness. For longer storage, freeze in a sealed jar for 3 months. Thaw overnight in the fridge before rewarming. Never reheat directly from frozen—this causes separation.
Can I use this icing for warm desserts?
Yes, but with caution. Warm the icing slightly in 10-second bursts in the microwave until it flows easily. It should be warm enough to drizzle but not hot. This works perfectly for warm cookies, brownies, or freshly baked cakes. The heat from the dessert will help the icing set beautifully. For extra sheen, brush warm desserts with a little milk first.