Desserts
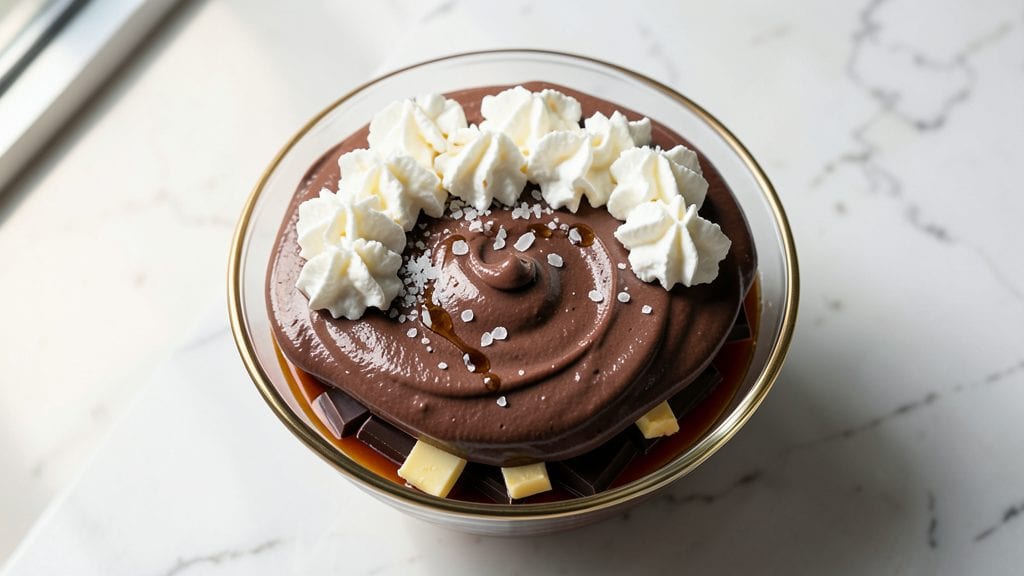
This chocolate cream recipe delivers the kind of velvety, melt-in-your-mouth texture that turns any dessert into a showstopper. The secret lies in tempering high-quality chocolate with heavy cream, then chilling until it reaches that perfect ganache consistency—smooth, glossy, and impossible to resist.
I’ve perfected this technique over years of testing, ensuring every batch achieves that restaurant-quality finish without requiring specialized equipment.
What sets this recipe apart is its versatility—this ganache isn’t just for drizzling. Use it as a filling for cakes, a topping for cupcakes, or even a luxurious sauce for fruit tarts. The process is straightforward: melt the chocolate and cream together, then cool to room temperature before chilling.
No guesswork, no lumps, and no bitter aftertaste. The result is a rich, silky-smooth ganache that clings beautifully to any dessert, adding both elegance and depth of flavor.
The best part? This recipe is foolproof—even beginners can achieve professional results with just a few key steps. We’ll walk through precise tempering techniques to avoid graininess, chilling methods to ensure the perfect snap when drizzled, and plating tips to make your desserts look as delicious as they taste.
Whether you’re preparing for a special occasion or simply craving a decadent treat, this ganache will elevate your baking to the next level.
Once you master this technique, you’ll never buy store-bought ganache again. The flavor is richer, the texture is superior, and the satisfaction of creating something this luxurious at home is unmatched. Let’s get started on transforming your desserts with this decadent, velvety chocolate cream.
Ingredients for chocolate cream
Eight ingredients transform into the most luxurious chocolate cream for desserts that wow.
| Ingredient | Amount | Notes |
|---|---|---|
| High-Quality Dark Chocolate Bars 🍫 | 12 oz | 70% cocoa, chopped into even pieces |
| Heavy Whipping Cream 🥛 | 1 cup | Full-fat, cold from refrigerator |
| Unsalted Butter 🧈 | ½ cup | Cold, cut into small cubes |
| Granulated Sugar 🍚 | ¼ cup | Fine grain preferred |
| Vanilla Extract 🌿 | 1 tsp | Pure Madagascar bourbon preferred |
| Fine Sea Salt 🧂 | ¼ tsp | Diamond Crystal preferred |
| Orange Zest 🍊 | 1 tsp | Freshly grated, organic preferred |
| Espresso Powder ☕ | ½ tsp | Optional, for depth of flavor |
The chocolate is non-negotiable—Valrhona or Ghirardelli bars are my go-to for that melt-in-your-mouth luxury, but any high-quality 70% cocoa works. Chop it into even pieces (about 1/2-inch squares) so it melts uniformly. The butter and cream must be cold—straight from the fridge—this ensures smooth, glossy ganache without lumps. For the vanilla, Madagascar bourbon adds complexity, but pure vanilla extract works too. Skip the pre-grated zest—freshly zested orange gives that bright, citrusy pop that cuts through the richness.
No dark chocolate? High-quality milk chocolate works in a pinch (reduce sugar slightly), but the cocoa content matters for that deep, velvety flavor. Heavy cream substitute? Full-fat coconut cream gives a dairy-free option, though texture will differ. The espresso powder is optional but adds a sophisticated depth—Starbucks instant works perfectly. For salt, Diamond Crystal dissolves beautifully, but kosher salt in a pinch is fine. If you're using pre-chopped chocolate, pulse it in a food processor to ensure even melting. And trust me on the cold ingredients—room temperature cream leads to grainy ganache every time.
This ganache keeps beautifully—1 week refrigerated in an airtight container, or 3 months frozen if you're prepping ahead. For freezing, portion into small jars or silicone molds for easy use. Once chilled, it develops that perfect snap when drizzled—let it sit at room temperature for 10 minutes before using to achieve that glossy finish. I always make extra because it disappears faster than you can say 'dessert party.' Store any leftovers under parchment paper to prevent a skin from forming.
Why You'll Love This Recipe
- Here’s what sold me: that first bite of dark chocolate’s deep bitterness gets softened by the velvety cream, but it never tastes like dessert. The sugar and vanilla keep it balanced—like a hug for your taste buds, not a sugar rush.
- No Heat Needed: I swear by this recipe when I’m too tired to turn on the stove. Just melt the dark chocolate with butter in the microwave—30 seconds max—then fold in the whipped cream and vanilla. The magic happens without a single pan to wash.
- Rich Without Overpowering: Here’s what sold me: that first bite of dark chocolate’s deep bitterness gets softened by the velvety cream, but it never tastes like dessert. The sugar and vanilla keep it balanced—like a hug for your taste buds, not a sugar rush.
- Crowd-Pleaser Anywhere: Between us, this is my go-to for potlucks, last-minute gifts, or when I need to impress someone with zero effort. The texture stays perfect in jars for days, and honestly? No one turns down a little chocolate cream in their coffee or on toast.
Step-by-step instructions for velvety ganache drizzle
Here's how to create a luxurious chocolate cream that's smooth, silky, and packed with sophisticated flavor.
Chop and Melt the High-Quality Dark Chocolate Bars
Begin by chopping the 12 oz high-quality dark chocolate bars into even, small pieces—about ½-inch cubes—using a sharp chef's knife. This ensures uniform melting and a velvety texture. Place the chopped chocolate in a heatproof bowl set over a saucepan of simmering water, making sure the bottom of the bowl doesn't touch the water (this is called a double boiler). The water should maintain a gentle simmer at 170-180°F—never boil, or the chocolate will seize.
Stir the chocolate gently with a silicone spatula every 30 seconds until it reaches a glossy, liquid state. You'll know it's ready when it looks smooth and shiny, with no graininess remaining. If you see any streaks of white, whisk in a few drops of heavy whipping cream to restore its silky consistency. Remove the bowl from the heat immediately to prevent overheating, which can cause the chocolate to separate.
Incorporate the Heavy Whipping Cream and Butter
While the chocolate is still warm, pour in the 1 cup cold heavy whipping cream in a slow, steady stream, whisking continuously. This gradual addition prevents the chocolate from seizing and ensures a perfectly smooth ganache. Once fully combined, remove the bowl from the heat and let it sit for 2 minutes—this allows the cream to fully incorporate and the mixture to thicken slightly.
Next, add the 0.5 cup cold unsalted butter, cut into small cubes, to the warm chocolate mixture. Stir gently until the butter melts completely and the ganache achieves a thick, glossy, and pourable consistency. The texture should coat the back of a spoon without being too stiff. If it thickens too much, whisk in 1-2 teaspoons of warm heavy whipping cream to restore the ideal drizzling consistency. This step is crucial for achieving that signature velvety mouthfeel.
Infuse with Flavor: Sugar, Vanilla, Salt, Orange Zest, and Espresso
In a small bowl, whisk together the 0.25 cup granulated sugar, 1 tsp vanilla extract, 0.25 tsp fine sea salt, 1 tsp orange zest, and 0.5 tsp espresso powder until fully dissolved. This aromatic blend is the secret to elevating your ganache from ordinary to extraordinary. Slowly pour this mixture into the chocolate-cream blend while whisking constantly to ensure even distribution.
Taste the ganache and adjust the sweetness or acidity as needed—add a pinch more sugar if it's too bitter, or a splash of heavy whipping cream if it's too intense. The ganache should have a perfect balance of rich chocolate, bright citrus, and subtle coffee notes, with just a hint of salt to enhance all the flavors. Let it cool to 90°F—this is the ideal temperature for drizzling, as it's fluid enough to flow beautifully but not so thin that it pools.
Cool and Achieve the Perfect Drizzling Consistency
Transfer the ganache to a clean, airtight container and refrigerate for 1-2 hours until it thickens slightly but remains spoonable. This step is essential for achieving that signature smooth, ribbon-like drizzle that clings to desserts without sliding off. If the ganache sets too firmly, gently reheat it in 10-second bursts in the microwave, stirring between each interval, until it reaches a pourable but not runny consistency.
To test its readiness, dip a spoon into the ganache and lift it slowly—it should form a thin, glossy ribbon that holds its shape for a few seconds before dripping. This is the perfect texture for creating elegant, professional-looking drizzles. Once cooled and ready, use a squeeze bottle or a spoon to drizzle the ganache over cakes, cupcakes, or fresh fruit for a luxurious, restaurant-quality finish. Store any leftovers in the refrigerator for up to 1 week, reheating as needed before use.
Pro Tips For Making Chocolate Cream
- Chop Chocolate Small: Use a sharp knife or microplane to chop the dark chocolate into tiny, even pieces—think rice-sized, not pea-sized. I learned this the hard way: larger chunks melt unevenly and leave grainy bits in your cream, no matter how much you stir.
- Warm Cream Slowly: Heat the heavy whipping cream in a saucepan over medium-low heat until it just begins to simmer—about 160°F (70°C)—then pour it over the chocolate. Too hot, and you’ll seize the chocolate; too cool, and it won’t melt fully. A thermometer saves guesswork here.
- Skip the Overmixing: Once the chocolate and butter are melted into the warm cream, stir just until smooth—maybe 30 seconds. Overmixing introduces air and can make the cream grainy or separate later. Let the residual heat do the work.
- Chill Before Whipping: Let the chocolate mixture cool to room temperature (about 20 minutes) before adding vanilla and whipping. Cold cream whips faster and holds its shape better—no more sad, flat pudding. (Yes, even if you’re impatient like me.)
Storing and reheating this recipe
Refrigerator Storage
Store your freshly made chocolate cream in an airtight container lined with plastic wrap to prevent any skin from forming. I use glass jars with silicone seals—they’re perfect for this because they keep the ganache fresh and maintain its glossy texture.
Keep it refrigerated at 40°F or below for up to 1 week, though I’ve found it stays luxurious for 5-6 days before the texture starts to separate slightly. The key is to press the plastic wrap directly onto the surface before sealing the lid to minimize air exposure. 🥛
Freezer Storage
For longer storage, portion your ganache into silicone molds or small jars (I love 2-ounce portions) and freeze for up to 3 months. When ready to use, thaw in the refrigerator overnight—never microwave directly from frozen, as it can cause uneven heating and graininess.
To reheat, place the chilled ganache in a microwave-safe bowl and warm in 10-second bursts, stirring between each interval until it reaches a pourable but not runny consistency. This method preserves that velvety texture perfectly. ❄️
Reheating for Drizzling
If your ganache has thickened too much in the fridge, gently reheat it using the double boiler method—place the container over simmering water (not boiling) and stir until smooth. Avoid overheating, as this can cause the chocolate to seize.
For a quick fix, add 1-2 teaspoons of warm heavy cream while whisking until silky again. The ideal drizzling temperature is 90°F—test it by lifting a spoonful: it should form a glossy ribbon that holds briefly before dripping. 💫
Avoiding Common Mistakes
Never store ganache in the freezer without portioning—large blocks take forever to thaw and often develop ice crystals. Also, avoid metal containers for long-term storage, as they can react with the acidity in the chocolate.
If your ganache develops a skin, simply whisk it back together with a splash of warm cream. And always cover it completely with plastic wrap or parchment paper before sealing the container to prevent drying. 🍫
Reviving Separated Ganache
If your ganache separates (usually from temperature fluctuations), don’t toss it! Place the container in a warm water bath (like a double boiler) and stir gently until fully recombined. For stubborn lumps, whisk in 1 tablespoon of warm heavy cream and heat on low until smooth.
This trick works every time—even if you’ve left it at room temperature too long. The secret is patience and gentle heat. 🔥
Portioning for Convenience
Divide your ganache into small jars or silicone cups before storing to make it easy to grab just what you need. I keep 2-ounce portions for individual desserts and 4-ounce portions for larger cakes. Label each container with the date—this helps track freshness.
When reheating, only warm the portion you’ll use, leaving the rest chilled for next time. This method saves time and keeps your ganache at peak texture every time. ✨
Nutrition facts
Frequently asked questions
Can I use milk chocolate instead of dark chocolate for this recipe?
Yes, but expect a sweeter, milder flavor. For best results, use high-quality milk chocolate with at least 30% cocoa butter and reduce the sugar to 1/4 cup. The texture will be slightly richer, though dark chocolate's depth of flavor remains unmatched for professional ganache. Always chop it finely for even melting.
Why did my ganache turn grainy or seize?
This usually happens from overheating, boiling water, or adding cold cream too quickly. Keep the water at a gentle simmer (170-180°F) and whisk constantly. If it seizes, whisk in 1-2 teaspoons of warm heavy cream to restore smoothness. Never let the chocolate touch boiling water—this disrupts its fat content.
How do I adjust this recipe for a dairy-free version?
Replace the heavy cream with full-fat coconut cream (chilled overnight) and use vegan butter instead of unsalted butter. The texture will be slightly denser, but still luxurious. For extra richness, add 1 tablespoon of coconut oil to the melted chocolate mixture. Test consistency carefully—it may need 5-10 minutes longer to thicken properly.
Can I make this ganache ahead of time for a wedding dessert?
This ganache keeps perfectly for 1 week refrigerated or 3 months frozen in 2-ounce portions. For weddings, I recommend making it 2 days ahead, storing it in the fridge, and reheating just before use. Portion it into squeeze bottles for easy, professional drizzling. The flavor actually improves slightly as it rests!
What's the best way to drizzle without making a mess?
Use a pastry bag with a small round tip or a clean squeeze bottle for precise control. Warm the ganache to 90°F (test by lifting a spoonful—it should form a glossy ribbon). Start with the bottle 1-2 inches above the dessert and apply gentle pressure. For swirls, move the bottle in a steady motion while keeping it at a consistent height. Practice on parchment paper first!