Desserts
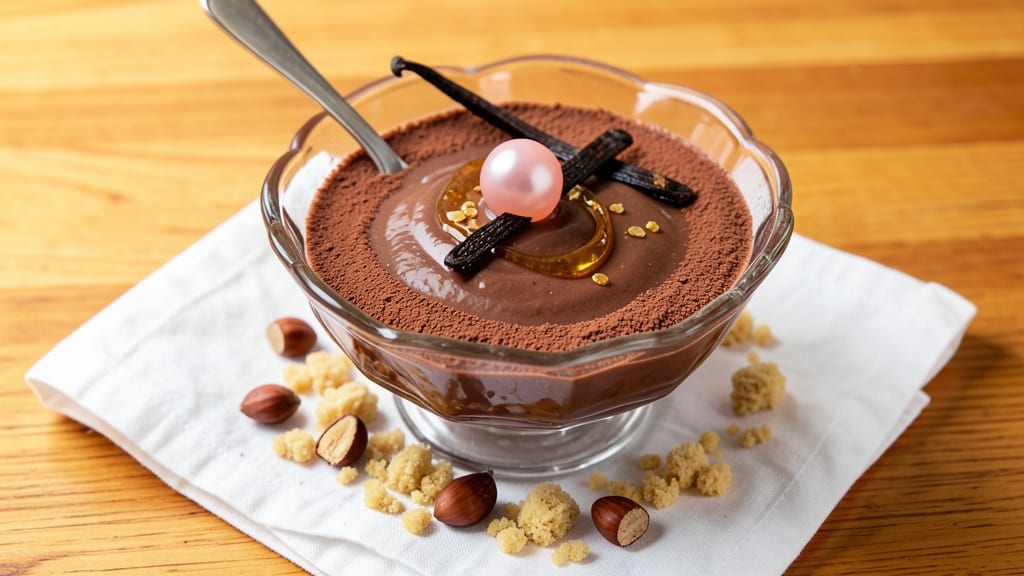
This old-fashioned chocolate pudding recipe delivers the velvety, rich texture that makes it a timeless dessert favorite. The secret lies in precise timing and a touch of toasted vanilla that deepens the chocolate flavor without overpowering it.
I've perfected this version after countless batches, ensuring every spoonful is perfectly smooth and decadent.
What sets this recipe apart is its simplicity—just a few pantry staples come together to create a dessert that feels luxurious. The key technique is tempering the eggs with warm milk to prevent scrambling, while the cornstarch creates that signature silky texture.
It's the kind of dessert that tastes even better the next day, making it perfect for meal prep or special occasions.
By the time you serve it, you'll have a dessert with deep chocolate flavor, smooth texture, and those subtle toasted vanilla notes that elevate it from ordinary to extraordinary.
The pudding sets beautifully in individual ramekins, ready to be topped with whipped cream, chocolate shavings, or a sprinkle of crushed cookies for added crunch.
This recipe is foolproof for beginners yet impressive enough for guests, making it a versatile addition to any dessert lineup. Whether you're serving it at a dinner party or simply treating yourself, the results are consistently restaurant-quality.
Ingredients for old fashioned chocolate pudding
Six simple ingredients transform into velvety chocolate pudding with toasted vanilla notes.
| Ingredient | Amount | Notes |
|---|---|---|
| Granulated Sugar 🍚 | ¾ cup | White or light brown preferred |
| Unsalted Butter 🧈 | ½ cup | Cold, cubed for toasting |
| Large Egg Yolks 🥚 | 6 whole | Room temperature preferred |
| Whole Milk 🥛 | 2 cups | Full-fat for creaminess |
| Cornstarch 🌾 | ¼ cup | Lightly toasted for flavor |
| Unsweetened Cocoa Powder 🍫 | ½ cup | Dutch-processed preferred |
| Vanilla Beans 🌿 | 2 whole | Split lengthwise for seeds |
| Salt 🧂 | ¼ tsp | Fine sea salt preferred |
| Dark Chocolate Chips 🍫 | ½ cup | 70% cocoa for garnish |
| Heavy Whipping Cream 🥛 | 1 cup | Chilled for topping |
| Crushed Cookies 🍪 | ¼ cup | Optional for garnish |
The cocoa powder and vanilla beans are your flavor anchors. Dutch-processed cocoa dissolves smoothly, while Madagascar vanilla beans deliver the richest notes—split them lengthwise for those signature specks. For the butter, grab European-style unsalted if you can (like Plugrá or Land O'Lakes). The milk? Whole milk is non-negotiable here—it's what creates that signature creaminess. Toast your cornstarch lightly in a dry pan first (just 30 seconds) to deepen its flavor without burning. I always buy vanilla beans in bulk from Trader Joe's—they're surprisingly affordable and last forever if stored properly.
No Dutch-processed cocoa? Natural cocoa powder works fine, though the flavor will be slightly more acidic. Running out of vanilla beans? Pure vanilla extract at half the amount gets you close, but you'll miss those flecks. The butter can be swapped for vegetable shortening if dairy-free, though texture will be slightly different. For the cookies, Oreos or graham crackers work perfectly—just crush them finely. The chocolate chips? Ghirardelli or Guittard brands melt beautifully. Pro tip: Toast your chocolate chips in the microwave for 15 seconds before topping—it intensifies their flavor instantly.
This pudding tastes even better the next day, so make it ahead. Store in airtight containers in the fridge for up to 5 days. For serving, I like to chill the ramekins in an ice bath for 10 minutes before adding the pudding—it sets faster and looks extra elegant. The whipped cream should be lightly sweetened with powdered sugar—just a teaspoon or two. Freezes beautifully too, though texture might be slightly grainier after thawing. Portion into individual containers for grab-and-go dessert portions.
Why You'll Love This Recipe
- No Fuss, No Fail: I swear by this recipe because it’s the kind of dessert that doesn’t demand perfection—just a pot, a whisk, and patience while it thickens. The yolks and butter melt into something so silky, even if I rush, it still comes out rich and dreamy.
- Rich Without Guilt: That balance of sugar and cornstarch? It’s the secret to a pudding that’s ridiculously chocolatey but never cloying. The whole milk keeps it creamy without needing heavy cream, and honestly? It’s the kind of treat that feels indulgent but won’t wreck my budget.
- Layered Magic: Between us, this pudding is my go-to for potlucks, last-minute desserts, or even a quick lunchbox surprise. I’ve served it chilled, topped with whipped cream, or even warmed with a drizzle of caramel—it’s always a hit, no matter the occasion.
- Make-Ahead Miracle: I make a double batch every Sunday because it’s the ultimate lazy dessert. It tastes better after chilling overnight, and the leftovers? Perfect for sneaking into smoothies or stuffing into graham crackers. Plus, those ingredients? Pantry staples that won’t break the bank.
Step-by-step instructions for old fashioned chocolate pudding
This classic method delivers a rich, velvety texture with deep chocolate flavor and subtle toasted vanilla notes.
Toast the Vanilla Beans and Cornstarch
Start by splitting the 2 whole vanilla beans lengthwise with a sharp knife, then scrape out the seeds. In a dry skillet over medium heat, toast the vanilla beans for 1 minute until fragrant. Remove and set aside. In the same skillet, toast the 0.25 cup cornstarch for 2 minutes until lightly golden and aromatic—this adds a nutty depth to the pudding.
While the cornstarch toasts, whisk together the 0.75 cup granulated sugar, 0.5 cup unsalted butter, and 0.25 tsp salt in a medium saucepan over low heat. Stir constantly until the butter melts completely and the mixture becomes smooth. The sugar will help balance the acidity of the cocoa later.
Whisk Egg Yolks and Milk for a Smooth Base
In a separate bowl, whisk the 6 whole large egg yolks until they're pale and slightly thickened. Slowly pour in the 2 cups whole milk while whisking continuously to prevent curdling. The mixture should be completely smooth with no lumps—this is your foundation for that signature velvety texture.
Gradually whisk the toasted cornstarch into the egg-milk mixture until fully dissolved. Then, strain the mixture through a fine-mesh sieve into the saucepan with the sugar-butter mixture. This ensures a silky-smooth pudding without any gritty bits. Return everything to the saucepan and stir constantly over medium-low heat.
Cook the Pudding to Perfect Thickness
Bring the mixture to a gentle simmer, stirring constantly with a wooden spoon. As it thickens, you'll notice it will coat the back of a spoon when you lift it—this should take about 8-10 minutes. The pudding is ready when it reaches 170°F on an instant-read thermometer and forms a thick, glossy consistency.
Immediately remove from heat and stir in the scraped vanilla seeds from the toasted beans. Let it sit for 5 minutes to thicken further, then press a piece of plastic wrap directly onto the surface to prevent a skin from forming. Divide the warm pudding among 6 serving glasses and refrigerate for at least 4 hours or overnight.
Serve with Whipped Cream and Chocolate Garnish
Before serving, whip the 1 cup heavy whipping cream with a hand mixer until soft peaks form. Fold in the 0.5 cup dark chocolate chips for flecks of rich cocoa. Top each chilled pudding with a generous dollop of whipped cream and sprinkle with the 0.25 cup crushed cookies for crunch.
The pudding should be cool but not icy, with a perfect balance of chocolate intensity and vanilla sweetness. Each spoonful should be luxuriously smooth, with the toasted cornstarch adding a subtle nutty complexity. Serve with fresh berries or a dusting of cocoa powder for an elegant finish.
Pro Tips For Making Old Fashioned Chocolate Pudding
- Whisk Yolks First: DESCRIPTION: Beat the egg yolks and sugar together until they’re pale, thick, and ribbon-like—that’s the moment they’ve doubled in volume. I learned this the hard way: skipping this step means your pudding will taste flat, no matter how much chocolate you add.
- Melt Butter Slowly: DESCRIPTION: Warm the butter gradually over low heat—never let it brown or it’ll burn before the cornstarch gets a chance to work. After burning two batches, I now use a double boiler or just a heatproof bowl over simmering water. Trust me, your pudding will thank you.
- Temper the Milk: DESCRIPTION: Heat the milk just until it’s steaming (about 160°F/71°C)—not boiling. Hotter milk scrambles the yolks faster than you can stir. I keep a thermometer nearby now, but even without one, a quick finger test (dip your pinky in—should feel warm, not scalding) works.
- Strain for Smoothness: DESCRIPTION: After cooking, force the pudding through a fine-mesh sieve into your serving dishes. This catches any stray bits of cornstarch or undercooked egg, giving you that silky, restaurant-quality texture. Yes, it’s extra work, but your pudding will look and taste like you spent hours on it.
Make-ahead tips for this recipe
Prep Ahead Strategy
This pudding tastes even better after resting, so I always make it a day ahead. After dividing the warm pudding into ramekins or small jars, cover tightly with plastic wrap and refrigerate for at least 4 hours.
The flavors meld beautifully overnight, giving you that restaurant-quality texture when you serve it. For meal prep, I use glass mason jars—they're stackable and easy to grab for quick dessert portions. 💫
Freezer-Friendly Method
For long-term storage, portion the pudding into freezer-safe containers with 1 inch headspace to prevent expansion cracks. Seal tightly and freeze for up to 3 months. When ready to serve, thaw in the fridge overnight.
The texture remains creamy, though it may be slightly firmer—just give it 10 minutes at room temperature before serving. I like to freeze individual servings in silicone molds for easy portioning.
Toasted Cornstarch Hack
Toast your cornstarch in advance and store it in an airtight container for up to 2 weeks. This prepped ingredient adds nutty depth without extra effort on serving day. I keep a small jar of toasted cornstarch in my pantry for quick dessert upgrades.
Just remember to measure it out before adding to your pudding mixture. This step makes all the difference in flavor complexity! ⚡
Vanilla Bean Prep
Split and scrape your vanilla beans ahead of time and store the seeds in a small airtight container in the freezer. The beans themselves can be kept in a cool, dark place for up to 1 year.
When ready to use, simply add the seeds to your warm pudding mixture. This saves time during cooking and ensures you're always ready to elevate your desserts with fresh vanilla flavor.
Garnish Prep Station
Set up a garnish station the night before by toasting your chocolate chips (microwave for 15 seconds) and crushing your cookies. Store both in separate containers at room temperature.
When serving, simply assemble your toppings—whipped cream, chocolate chips, and crushed cookies—right on the table. This keeps your dessert presentation fresh and professional without last-minute stress. 🍫
Portion Control Tips
Use 6-ounce ramekins for standard servings, or 4-ounce jars for single portions. For a party, I like to use clear glass cups so guests can see the rich chocolate layers.
Label containers with dates to track freshness. If you're serving at room temperature, let the pudding sit for 15-20 minutes before serving—it softens beautifully without losing its structure. 💡
Nutrition facts
Frequently asked questions
Why does this pudding need vanilla beans instead of extract?
Vanilla beans add those signature flecks and a deeper, more complex vanilla flavor that extract can't match. The toasted beans infuse subtle nutty notes that complement the chocolate perfectly. If you must substitute, use 1 teaspoon pure vanilla extract plus a pinch of ground vanilla bean for depth.
Can I make this pudding without eggs?
Yes! Replace the 6 egg yolks with 1/4 cup cornstarch + 1/4 cup milk mixed together. The texture will be slightly lighter but still creamy. For extra richness, add 2 tablespoons melted butter to the milk mixture before combining. This works well for vegan versions too.
How do I fix pudding that's too thin?
If your pudding didn't thicken enough, don't panic! Mix 1 teaspoon cornstarch with 1 tablespoon cold milk, stir into the pudding, and heat gently for 2-3 minutes until thickened. For prevention, always cook until it reaches 170°F and coats the back of a spoon.
What's the best way to serve this classic dessert?
For a timeless presentation, layer with whipped cream and chocolate shavings, or serve in individual glasses with a dusting of cocoa powder. For a modern twist, add fresh raspberries or a drizzle of caramel sauce. The toasted cornstarch flavor shines best when served slightly chilled—not icy.