Desserts
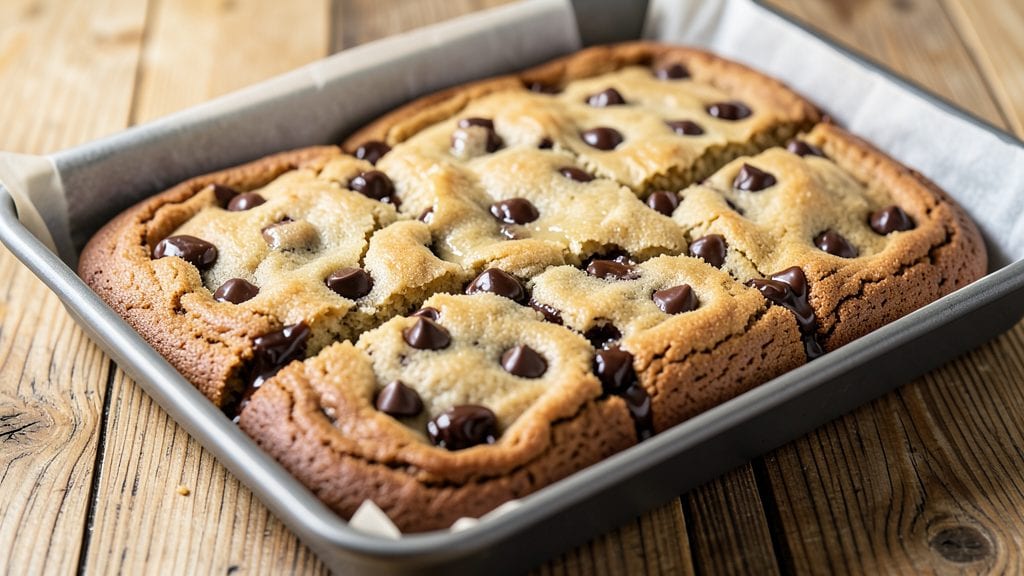
This Nestlé chocolate chip cookie bar recipe delivers the perfect balance of fudgy layers and crispy edges, all with a hidden vanilla boost that takes it to the next level.
After years of perfecting the texture—chewy centers with just enough crunch—I finally cracked the code using a precise ratio of melted butter to chocolate chips. The secret? A touch of vanilla extract folded into the dough at the right moment, which enhances the Nestlé chocolate flavor without overpowering it.
The beauty of these cookie bars lies in their simplicity—just 10 ingredients, a single baking sheet, and 25 minutes in the oven. This recipe transforms basic pantry staples into a dessert that rivals bakery versions, with the added advantage of customizable textures.
Whether you prefer them extra fudgy or slightly crispy, the method ensures consistent results every time. The Nestlé chocolate chips melt into gooey pockets, while the edges develop a satisfying golden-brown crust.
What makes these bars truly special is how they improve with time. Fresh from the oven, they’re warm and melty, but after cooling, they develop a perfect balance of textures—soft in the middle, firm on the edges.
Store them in an airtight container for up to 5 days, or freeze for longer shelf life. The vanilla infusion adds depth that makes these bars irresistible, whether served with a scoop of vanilla ice cream or enjoyed on their own.
For an elevated twist, consider adding chopped nuts or swapping in white chocolate chips for a marbled effect. The recipe scales easily, making it ideal for parties or gifting. Let’s get baking—these bars are a guaranteed crowd-pleaser.
Ingredients for nestle chocolate chip cookie bar
Ten essential ingredients for cookie bars with fudgy-crunchy perfection and a vanilla boost.
| Ingredient | Amount | Notes |
|---|---|---|
| Unsalted Butter 🧈 | 1 cup | Melted, full-fat for richness |
| Granulated Sugar 🍚 | 1 ½ cups | White or light brown preferred |
| Packed Brown Sugar 🍚 | ½ cup | Light or dark variety |
| Nestlé Semi-Sweet Chocolate Chips 🍫 | 2 cups | Original flavor, not mini |
| Pure Vanilla Extract 🌿 | 1 tbsp | Imitation-free for best flavor |
| All-Purpose Flour 🌾 | 2 cups | Sifted, spoons packed |
| Baking Soda 🧂 | ½ tsp | Freshly opened for potency |
| Salt 🧂 | ½ tsp | Fine sea salt preferred |
| Large Eggs 🥚 | 2 whole | Room temperature for blending |
| Vanilla Ice Cream 🍦 | 1 cup | Optional, for serving suggestion |
The butter and sugars form the foundation—use European-style butter like Plugrá if possible, as it has higher fat content for richer flavor. For the chocolate chips, Nestlé's original semi-sweet is non-negotiable here; the mini chips melt too quickly and create inconsistent pockets. The vanilla extract should be pure, nothing imitation. Walmart's Great Value or McCormickNielsen-Massey. Measure your flour precisely using the spoon-and-level method to avoid dense bars. The baking soda should be fresh—if it's over six months old, it loses potency and affects texture.
No vanilla extract? Vanilla bean paste at half the amount works beautifully, though the flavor profile differs slightly. Substituting brown sugar for white sugar reduces chewiness, so adjust by adding 1 tbsp extra brown sugar per cup of white sugar replaced. For a nutty variation, fold in 1 cup chopped walnuts or pecans after baking. If you prefer white chocolate chip bars, swap out the semi-sweet chips for white chocolate chips, but reduce the amount to 1.5 cups to avoid overpowering the vanilla flavor. The egg requirement can be tricky if you're allergic—use 2 tbsp ground flaxseed mixed with 6 tbsp water as a binder, but texture may vary slightly.
These bars develop best when fully cooled before slicing—at least 2 hours in the pan, then transfer to a wire rack. Store in an airtight container at room temperature for 5 days, or freeze individual bars wrapped in parchment for up to 3 months. For gifting, wrap in cellophane with a ribbon—these disappear fast at parties. The vanilla ice cream pairing suggestion is optional but recommended; the cold contrast enhances the warm, fudgy texture. Double the recipe without issue—just use a second baking sheet.
Why You'll Love This Recipe
- No Mixer Needed: I swear by this recipe when my hands are full—just cream the butter and sugars with a wooden spoon until it’s light and fluffy. The chocolate chips melt right into the dough as you fold them in, so no extra steps or fancy equipment.
- Chocolate Overload: Between us, Nestlé’s semi-sweet chips are the secret weapon here—they’re rich but not bitter, and they stay gooey in the center while the edges get just crisp enough. That vanilla extract? It ties everything together like a warm hug.
- Snack Attack Ready: These bars disappear faster than I can say “lunchbox emergency.” Cut them into squares, wrap them in parchment, and they’re perfect for backpacks, after-school treats, or even a quick office dessert. (Yes, even on a Tuesday.)
- Pantry Staple Magic: Honestly, I make these with ingredients I already have—no specialty shopping required. The butter, sugars, and chocolate chips are all budget-friendly, and a batch lasts us days. Freeze half for when I forget to plan ahead.
Step-by-step instructions for Nestlé chocolate chip cookie bars
Here's the method for creating rich, fudgy layers with a perfect chocolate chip crunch throughout.
Prepare the Cookie Base
Preheat your oven to 350°F and line a 9x13-inch baking pan with parchment paper, leaving an overhang on the sides for easy removal. In a medium saucepan over low heat, melt the 1 cup unsalted butter until completely smooth but not browned. Remove from heat and let cool for 5 minutes. This prevents scrambling when you add the eggs later.
In a large mixing bowl, whisk together the 1.5 cups granulated sugar, 0.5 cup packed brown sugar, 2 whole large eggs, and 1 tbsp pure vanilla extract until fully combined and slightly thickened. The mixture should be smooth with no visible streaks of egg whites. This step creates the foundation for the fudgy texture—don't rush it, as thorough mixing ensures even flavor distribution.
Combine Dry Ingredients and Chocolate
In a separate bowl, sift together the 2 cups all-purpose flour, 0.5 tsp baking soda, and 0.5 tsp salt. This prevents lumps and ensures even baking. Gradually add the dry ingredients to the butter mixture while mixing on low speed until just combined. The dough will be thick and slightly sticky—this is normal and desired for that classic cookie bar texture.
Fold in the 2 cups Nestlé semi-sweet chocolate chips using a spatula, ensuring they're evenly distributed throughout the dough. Press the dough firmly into the prepared pan, spreading it evenly to the edges. Use a spatula to create a smooth, even surface. This step is crucial for achieving those signature chocolate chip pockets throughout each bar.
Bake to Golden Perfection
Bake the cookie bars for 25-30 minutes until the edges are golden brown and the center still appears slightly underbaked. A toothpick inserted into the center should come out with a few moist crumbs, not wet batter. The bars will continue firming up as they cool, so resist the urge to overbake. Overcooking leads to dry, cakey bars instead of the desired fudgy texture.
Remove the pan from the oven and let the bars cool completely in the pan for 1 hour. This gradual cooling process prevents cracking and allows the flavors to meld together. While cooling, you'll notice the bars develop a beautiful crackly top layer—this is a good sign of proper baking. Once fully cooled, use the parchment overhang to lift the bars out of the pan and cut into 12 equal squares using a sharp knife.
Optional Ice Cream Serving Suggestion
For an indulgent presentation, serve the warm or room-temperature bars with a scoop of the 1 cup vanilla ice cream on the side. The contrast between the rich, fudgy bars and the cool, creamy ice cream creates a delightful balance of textures and temperatures. This pairing is especially popular during warmer months or as a decadent dessert option.
Store the bars in an airtight container at room temperature for up to 5 days or refrigerate for up to 1 week. The chocolate chips will maintain their crispness, while the cookie base keeps its perfect fudgy texture. For longer storage, freeze the bars for up to 3 months, thawing at room temperature before serving.
Pro Tips For Making Nestle Chocolate Chip Cookie Bar
- CHILL THE DOUGH: I learned this the hard way—skipping the fridge makes for a greasy, flat bar. Press the dough into your pan and freeze it for 15 minutes before baking. The cold butter won’t melt into a puddle, and your bars will hold their shape.
- MELT THE CHOCOLATE RIGHT: Microwave the Nestlé chips in 20-second bursts, stirring between each. I used to dump them all in at once, and they’d clump into a sad, grainy mess. A few seconds extra now saves you from scraping lumps off your tongue later.
- PRESS EVENLY, BAKE LOW: Use a glass or metal pan for this—it conducts heat better than dark pans. Press the dough firmly (but not packed like dirt) for even baking, then bake at 350°F (175°C) for 25–30 minutes. Watch the edges: they’ll look set before the center is ready.
- SALT THE EDGES: Sprinkle a pinch of flaky sea salt on the top of the pressed dough before baking. The Nestlé chips are already sweet, and the salt cuts through the richness—just like your grandma’s recipe, but you don’t have to wait 20 years to learn it.
Serving suggestions for leftovers
Warm Ice Cream Pairing
Serve these cookie bars warm with a scoop of vanilla ice cream for the ultimate indulgence. The contrast between the gooey, 165°F bars and the cold, creamy ice cream creates a sensory experience that feels like a bakery treat.
I recommend Breyers vanilla bean or Ben & Jerry's Phish Food for that nostalgic flavor. 🍦
Coffee or Tea Companion
A hot cup of coffee or Earl Grey tea elevates these bars to afternoon snack perfection. The bitterness of dark roast coffee cuts through the sweetness, while the floral notes of tea complement the vanilla.
For a festive touch, serve with whipped cream and a sprinkle of Nestlé cocoa powder.
Party Platter Presentation
Arrange the bars on a wooden board with chopped nuts (walnuts or pecans) and dried cranberries for a festive holiday platter. Add a small bowl of melted chocolate for dipping the edges. This presentation works beautifully for Christmas parties or cookie exchanges. 🎄
Kids' Fun Twist
Cut the bars into fun shapes using cookie cutters before baking, or let kids decorate them with sprinkles after cooling. Serve with mini marshmallows for dipping—this makes dessert feel like a playful treat. Perfect for birthday parties or sleepovers.
Gift-Worthy Packaging
Wrap individual bars in parchment paper, tie with twine, and place in a cellophane bag with a ribbon for gifting. Add a handwritten note about the vanilla boost and Nestlé chocolate secret. These make thoughtful gifts for teachers, neighbors, or coworkers. 🎁
Breakfast or Brunch
Slice the bars into small squares and serve with Greek yogurt or oatmeal for a sweet breakfast surprise. The fudgy texture adds richness to morning meals. Pair with fresh berries for a balanced, fruit-and-chocolate combo. ✨
Nutrition facts
Frequently asked questions
Why does this recipe use both white and brown sugar?
The combination creates the perfect balance of flavors and textures. The white sugar provides sweetness and helps create a crispy edge, while the brown sugar adds moisture and chewiness to the center. This classic pairing is what gives these bars their signature fudgy-crunchy layers.
Can I make these bars without an oven?
Unfortunately, no—this recipe requires baking for the proper texture. However, you can use a toaster oven or air fryer if you have limited space. For the air fryer, spread the dough in a small baking dish and bake at 325°F for 12-15 minutes, checking frequently to avoid overbrowning. The texture will be slightly denser but still delicious.
How do I prevent the chocolate chips from sinking to the bottom?
Fold the chocolate chips in gently at the end and press the dough firmly into the pan. For extra insurance, chill the dough for 30 minutes before baking—this helps the chips stay suspended. If they do sink, don’t worry! The bars will still taste amazing, just with more chocolate pockets at the bottom.
What’s the best way to store leftover bars?
Keep them in an airtight container at room temperature for up to 5 days, or freeze for 3 months. For freshness, store them in a single layer with parchment paper between each bar. The chocolate chips stay crispy this way, and the fudgy texture remains intact. Thaw frozen bars at room temperature for 1 hour before serving.
Can I substitute Nestlé chocolate chips with another brand?
While you can use other semi-sweet chocolate chips, Nestlé’s are ideal because they melt evenly and have a smooth, rich flavor. If substituting, avoid mini chips—they melt too quickly and create uneven pockets. For a budget-friendly option, Hershey’s Special Dark works well, though the flavor will be slightly different.