
Desserts
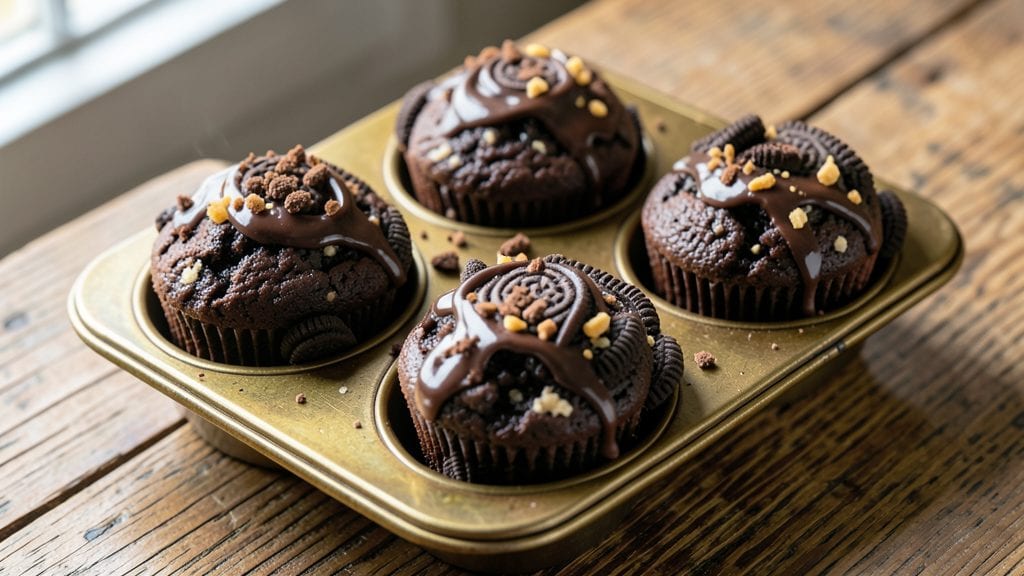
This chocolate Oreo muffins recipe delivers the perfect balance of moist, rich chocolate cake with chunks of crushed Oreos in every bite—no one will believe they're homemade.
The secret lies in carefully folding in the cookie pieces at the last moment to preserve that signature crunch while keeping the muffins tender inside.
I perfected this recipe after years of testing, ensuring the texture stays just right: soft enough to melt in your mouth but sturdy enough to hold up to a glaze.
What sets these apart is the combination of dark cocoa powder and melted chocolate in the batter, which creates a deep, fudgy flavor that pairs beautifully with the sweet, crumbly Oreos. The recipe uses simple pantry staples—flour, sugar, eggs, and of course, Oreos—but the technique makes all the difference.
No overmixing here; we're keeping those muffins light and airy with just the right amount of texture contrast.
By the time these muffins emerge from the oven, you'll have golden domes with a crackly top, revealing pockets of melted chocolate and Oreo crumbles throughout.
The aroma alone will have everyone gathering around your kitchen, and the first bite delivers that perfect harmony of cakey, crunchy, and creamy all at once. Trust me, these disappear faster than you can say "second helping."
Serve them warm with a dusting of powdered sugar or a drizzle of chocolate ganache for extra indulgence. They're ideal for breakfast treats, dessert tables, or even a mid-afternoon pick-me-up. Let's get baking—your taste buds will thank you.
Ingredients for chocolate oreo muffins
Pantry staples plus one iconic cookie—this list makes magic happen.
| Ingredient | Amount | Notes |
|---|---|---|
| All-Purpose Flour 🌾 | 2 ½ cups | Sifted for light texture |
| Granulated Sugar 🍚 | 1 ½ cups | White or light brown |
| Packed Brown Sugar 🍚 | ½ cup | For moisture and depth |
| Unsalted Butter 🧈 | 1 cup | Cold, cubed for best texture |
| Large Eggs 🥚 | 2 whole | Room temperature preferred |
| Vanilla Extract 🌿 | 1 tbsp | Pure, not imitation |
| Dark Cocoa Powder 🍫 | ½ cup | Dutch-processed preferred |
| Semisweet Chocolate Chips 🍫 | 1 cup | High-quality for melting |
| Oreos 🍪 | 1 ½ cups | Crushed, not pre-crushed mix |
| Baking Powder 🧂 | 1 ½ tsp | Freshly measured |
| Salt 🧂 | ½ tsp | Fine sea salt |
| Milk 🥛 | 1 cup | Whole milk for richness |
| Powdered Sugar 🍚 | ¼ cup | For dusting, optional |
The Oreos are non-negotiable here. Oreos are best fresh from the package—those pre-crushed mixes get stale fast. I always grab the 14.3 oz family pack from Walmart or Target because it's cheaper per cookie. Crush them yourself with a rolling pin or zip-top bag—no food processor, that makes them turn to dust. The cocoa powder? Dutch-processed (like Hershey's Special Dark) gives a smoother flavor, but regular cocoa works too. For the butter, Land O'Lakes or Plugrá are my go-tos—they melt evenly without separating.
No Oreos? Crushed graham crackers or vanilla wafers add a different but still delicious crunch. Short on cocoa powder? Melted chocolate chips at 1:1 ratio works in a pinch, but the texture gets slightly denser. The chocolate chips can be swapped for white chocolate chips if you prefer a sweeter contrast. For the sugar, I like to mix white and brown to balance the flavors—brown adds moisture, white keeps it crisp. The milk can be swapped for buttermilk if you've got it, but regular milk works just fine. Just don't skip the vanilla—it's what ties everything together.
These muffins stay fresh for 3 days at room temperature, wrapped in a towel to keep them moist. For longer storage, freeze them for up to 3 months—wrap individually in plastic wrap, then toss in a freezer bag. Reheat in the microwave for 20-30 seconds to restore that fresh-baked crunch. I always make a double batch because they disappear fast—breakfast, dessert, or snack, these are a crowd-pleaser every time.
Why You'll Love This Recipe
- You’re already using basics: flour, sugar, butter, eggs. No specialty ingredients, no last-minute grocery runs. I’ll be real: I’ve made these with whatever Oreos I had on hand, and they’re still ridiculous good.
- No Mixer Needed: The batter comes together with just a fork and a bowl—no stand mixer or fancy tools. I swear, you’ll have it ready while your coffee brews, thanks to the creamed butter and sugars doing all the work.
- Rich Without Guilt: That combo of brown sugar and butter? Pure decadence, but the flour and eggs keep it from being too heavy. Honestly, I’ve made these for breakfast and dessert—no one judges, and neither should you.
- Breakfast or Treat: Pack them for lunch, freeze extras for a quick snack, or serve them at brunch. Between us, they’re my go-to for potlucks too—everyone grabs seconds, and I don’t have to stress about a main dish.
Step-by-step instructions for chocolate Oreo muffins
Here's how to bake these decadent muffins with perfect texture and rich chocolate flavor.
Prepare Your Mixing Tools and Ingredients
Preheat your oven to 375°F and line a standard muffin tin with 12 paper liners. I like to use the liners that have the little tabs on top—they make removing muffins so much easier. While the oven heats, take your 1.5 cups Oreos and pulse them in a food processor until they're finely crushed, about 10-15 seconds. You want them small enough to distribute evenly but not so fine they turn into powder.
In a medium bowl, whisk together the 2.5 cups all-purpose flour, 1.5 tsp baking powder, and 0.5 tsp salt. Sift this mixture through a fine-mesh strainer into another bowl to remove any lumps. This step ensures your muffins will be light and tender rather than dense. Set this dry mixture aside for now—we'll come back to it in the next step.
Cream Butter and Sugars for Maximum Fluffiness
In a large mixing bowl, combine the 1 cup unsalted butter (cut into cubes and softened but not melted), 1.5 cups granulated sugar, and 0.5 cup packed brown sugar. Using an electric mixer on medium speed, beat these ingredients together for 3-4 minutes until light and fluffy. You'll know it's ready when the mixture nearly doubles in volume and leaves a ribbon-like trail when you lift the beaters.
This creaming process incorporates air into the batter, which helps create those beautiful domed tops and a tender crumb. If your butter isn't quite soft enough, let it sit at room temperature for 10-15 minutes before starting. Cold butter won't cream properly and can lead to dense muffins.
Add Wet Ingredients and Create the Batter
Add the 2 whole large eggs one at a time, mixing well after each addition. Then stir in the 1 tbsp vanilla extract and 0.5 cup dark cocoa powder. The batter will look thick and almost like a brownie dough at this point. Scrape down the sides of the bowl with a spatula to ensure all the ingredients are fully incorporated.
Gradually add the dry flour mixture you prepared earlier, mixing on low speed just until combined. Be careful not to overmix—you should still see a few streaks of flour. Then, gently fold in the 1 cup semisweet chocolate chips and crushed Oreos using a spatula. The batter will be thick but spoonable. If it seems too thick, add 1-2 tablespoons of milk to loosen it slightly.
Fill Muffin Cups and Bake to Golden Perfection
Divide the batter evenly among the 12 muffin cups, filling each about ¾ full. The batter will be thick, so use a spoon to scoop it in. Gently tap the muffin tin on the counter to release any air bubbles that might have formed. Bake in the preheated oven for 18-20 minutes, until the tops are deep golden brown and a toothpick inserted into the center comes out with just a few moist crumbs (not wet batter).
Here's the thing—don't open the oven door during the first 15 minutes of baking. The heat fluctuation can cause the muffins to sink or develop a dome too quickly. If you notice the tops browning too fast before the 18-minute mark, loosely tent the tin with aluminum foil to prevent over-browning while still allowing steam to escape.
Cool and Enjoy Your Crunchy Treats
Remove the muffins from the oven and let them cool in the pan for 5 minutes. Then transfer them to a wire rack to cool completely. The cooling process is crucial—it allows the muffins to set properly and develop that perfect texture where each bite has both moist cake and crisp Oreo crunch.
Once cooled, you can dust the tops with 0.25 cup powdered sugar if you like that extra touch of sweetness. These muffins are best enjoyed fresh, but you can store them in an airtight container at room temperature for up to 3 days. For an extra treat, serve them warm with a scoop of vanilla ice cream or a dollop of whipped cream. The contrast of warm muffin and cold ice cream is pure magic!
Pro Tips For Making Chocolate Oreo Muffins
- MEASURE BUTTER COLD: Don’t grab that melted butter straight from the microwave—it’ll make your muffins greasy and dense. Cut the unsalted butter into cubes and let them sit at room temp for no more than 20 minutes before creaming. You want it soft enough to mix easily, but not liquid. I learned this the hard way when my first batch turned out like hockey pucks.
- CHOP OREOS FINE: Skip the food processor unless you’re making a cookie, not a muffin. Crush the Oreos into small, uneven pieces—think fine crumbs with some texture left. This ensures even distribution in the batter and prevents big chunks that won’t bake through. (Yes, I’ve pulled out a muffin with a raw Oreo center. Don’t be that person.)
- FOLD DRY INGREDIENTS GENTLY: Once you add the flour mix, resist the urge to stir like you’re mixing cake batter. Use a spatula to fold in just until combined—overmixing develops gluten, and your muffins will turn tough instead of tender. Stop when there are a few streaks of flour left. I used to overdo it, and my muffins ended up more like dense brown bread.
- BAKE UNTIL SPRINGY: Don’t rely on the toothpick test—these aren’t vanilla muffins. Instead, press the center lightly: it should spring back slowly, not bounce right up. If it’s still wet or gummy, bake another 2-3 minutes. Underbaking is worse than overbaking here—your Oreos won’t crisp up properly. (And yes, I’ve had to nuke a batch to salvage them. Trust the spring.)
Common mistakes when making your chocolate oreo muffins
Overmixing the Batter
This is the #1 mistake I see beginners make—turning their muffin batter into cake batter. Once you add the dry ingredients, mix just until combined (about 15-20 strokes with a spatula).
Overmixing develops gluten, which makes muffins tough instead of tender. I've ruined batches by mixing too long—honestly, the batter should still look slightly streaky. 💫
Uneven Oreo Distribution
Don't just dump all the crushed Oreos into the batter at once—they'll clump together. Instead, fold them in gently in two batches using a spatula. For even distribution, I like to sprinkle a few Oreos into each muffin cup before adding batter, then top with more batter.
This ensures every bite has that signature crunch.
Skipping the Cooling Phase
New bakers always want to dig in immediately, but letting muffins cool in the pan for 5 minutes then on a rack prevents them from falling apart.
The internal structure needs time to set properly. I've seen muffins crumble completely when pulled out too soon—trust the process, even if it's hard to wait!
Incorrect Oven Temperature
Your oven might not be at the exact 375°F you set it to. Invest in an oven thermometer—mine reads 350°F when set to 375°F! Bake at 350°F if your oven runs hot. The muffins need consistent heat to rise properly and develop that perfect dome shape. 🌡️
Using Old Ingredients
Stale baking powder or old cocoa powder can make muffins flat and dense. Check your baking powder's freshness by mixing 1 tsp with 3 tbsp hot water—it should bubble vigorously.
For cocoa, store it in an airtight container away from light. I always buy cocoa powder in 12 oz containers from Penzeys Spices because it stays fresh longer.
Overfilling Muffin Cups
Filling cups more than ¾ full causes muffins to overflow and bake unevenly. Use a ¼ cup measuring cup to portion batter accurately. I like to gently tap the muffin tin on the counter after filling to release air bubbles.
This ensures even baking and that perfect dome shape we all love. 💡
Nutrition facts
Frequently asked questions
Can I make these muffins without Oreos?
Swap the crushed Oreos for 1.5 cups of graham cracker crumbs or vanilla wafer cookies for a different but still delicious crunch. For a chocolate alternative, try chocolate cookie crumbs or even crushed pretzels for a salty contrast. Just keep the total amount at 1.5 cups for proper texture balance.
Why do my muffins come out dense instead of light and fluffy?
Dense muffins usually happen from overmixing the batter or using stale ingredients. Mix the wet and dry ingredients just until combined—15-20 strokes max—to avoid developing gluten. Also check your baking powder (it should be fresh) and make sure your butter is softened but not melted before creaming. Cold butter won't incorporate air properly.
How can I make these muffins extra moist?
For ultra-moist muffins, replace 2 tablespoons of milk with 2 tablespoons of sour cream or Greek yogurt in the batter. You can also add 1 tablespoon of vegetable oil to the wet ingredients. Another trick is to brush the tops with simple syrup (equal parts sugar and water) while they're still warm in the oven.
Can I make these muffins ahead of time?
Yes! These muffins stay fresh for 3 days at room temperature in an airtight container. For longer storage, freeze them for up to 3 months. Wrap each muffin individually in plastic wrap, then place in a freezer bag. To serve, thaw at room temperature or reheat in the microwave for 15-20 seconds to restore that fresh-baked crunch.
What's the best way to add extra chocolate flavor?
For a richer chocolate taste, melt ½ cup of semisweet chocolate and stir it into the wet ingredients before mixing. You can also add 1 teaspoon of instant espresso powder to deepen the chocolate flavor. Another option is to swap some of the flour for 2 tablespoons of cocoa powder (increase milk by 1 tablespoon to compensate).