Desserts
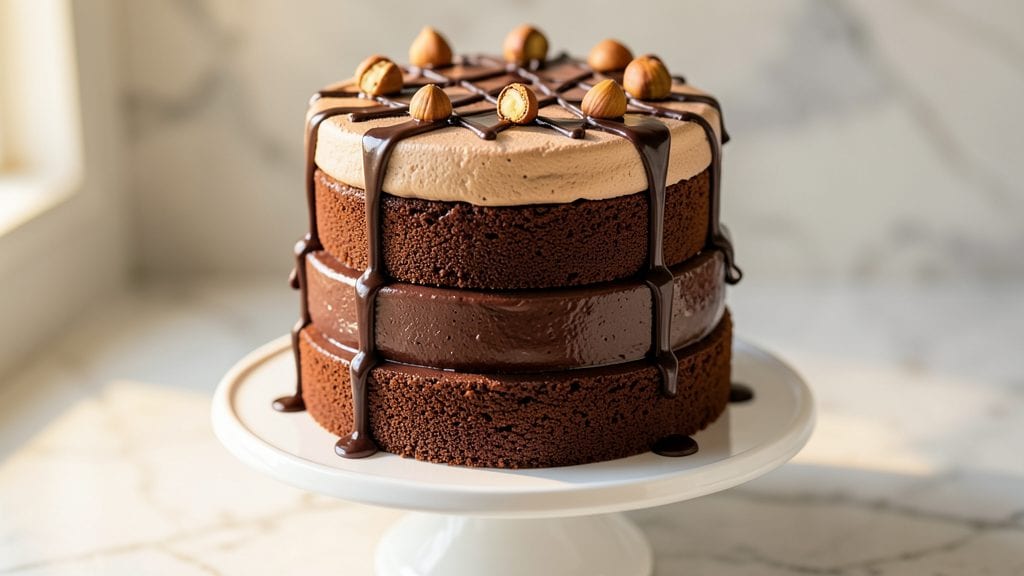
This chocolate layered mousse cake recipe delivers the perfect balance of rich, fudgy ganache layers and light, airy swirls that make every slice unforgettable.
The secret lies in a dense, moist cake base infused with dark chocolate and espresso powder, paired with velvety mousse that stays silky even after hours in the fridge.
I developed this recipe after years of experimenting with textures—too many cakes are either too heavy or too fragile, but this one hits the sweet spot every time.
The foundation starts with a foolproof cake batter that bakes to a tender yet sturdy texture, ideal for supporting the mousse layers without crumbling. While the cake cools, the mousse comes together using high-quality cocoa powder and heavy cream whipped to cloud-like perfection.
Assembly is where the magic happens—alternating layers of ganache-soaked cake and mousse creates that signature swirl effect that looks as impressive as it tastes.
What you’ll end up with is a dessert that’s restaurant-quality but achievable at home: deep chocolate flavor in every bite, a velvety mousse that melts on your tongue, and a structure that holds together beautifully.
The cake’s edges stay moist, the mousse remains light, and the ganache adds that luxurious richness that makes this worth every calorie. Serve it chilled with fresh berries or a drizzle of raspberry sauce for an extra touch of elegance.
This recipe is perfect for special occasions or when you want to impress guests without spending hours in the kitchen. With precise baking times and chilling instructions, you’ll have a showstopping dessert ready in under an hour of active time—plus the patience to let it set.
Let’s get started on creating this decadent masterpiece that’s sure to become a crowd favorite.
Ingredients for chocolate layered mousse cake
Rich chocolate cake layers meet airy mousse swirls—just these 13 ingredients create restaurant-quality decadence.
| Ingredient | Amount | Notes |
|---|---|---|
| All-Purpose Flour 🌾 | 1 ½ cups | Sifted for light texture |
| Unsalted Butter 🧈 | 1 cup | Cold, cubed for cake layers |
| Granulated Sugar 🍚 | 2 cups | Superfine preferred for smoothness |
| Dark Chocolate Chips 🍫 | 1 ½ cups | 70% cacao minimum |
| Large Eggs 🥚 | 4 whole | Room temperature for even mixing |
| Espresso Powder ☕ | 1 tbsp | Instant, for chocolate depth |
| Baking Powder 🍞 | 1 ½ tsp | For lift in cake layers |
| Salt 🧂 | ½ tsp | Fine sea salt preferred |
| Heavy Cream 🥛 | 3 cups | Cold for mousse whipping |
| High-Quality Cocoa Powder 🍫 | ½ cup | Dutch-processed preferred |
| Powdered Sugar 🍚 | 1 ½ cups | For mousse sweetness |
| Vanilla Extract 🌿 | 1 tbsp | Pure Madagascar preferred |
| Raspberry Sauce 🍓 | ½ cup | For garnish, optional |
The chocolate chips and cocoa powder are non-negotiable for deep flavor. Ghirardelli 70% cacao or Valrhona are my go-tos, but any high-quality dark chocolate works. For the espresso powder, Starbucks or Nescafé instant are perfect—no need for fancy equipment. The heavy cream should be cold straight from the fridge when you whip it; room temperature cream won't hold its volume. Butter matters too—Plugrá or Land O'Lakes unsalted are reliable choices, but avoid salted or European-style butter with lower water content.
No espresso powder? Strong brewed coffee cooled works in a pinch (use half the amount). Out of cocoa powder? Melted dark chocolate can replace it at a 1:1 ratio, but strain out any lumps. For the mousse, powdered sugar is key—it dissolves completely and doesn't weigh down the texture. The raspberry sauce can be store-bought (Trader Joe's has a great one) or homemade from frozen berries. If you're making this ahead, freeze the assembled cake for up to 2 months—thaw overnight in the fridge for perfect texture.
Assembled cake keeps 3-4 days in the fridge, but the mousse layers stay best within 2 days. For serving, let it sit at room temperature for 15 minutes before slicing—this helps the mousse soften slightly. I always make a double batch of mousse because it's so versatile: use the extras for trifles or ice cream toppings. The cake layers themselves? Wrap tightly in plastic and store at room temperature for up to 3 days before assembling.
Why You'll Love This Recipe
- No-Fuss Layers: I swear, this cake only needs a whisk and a bowl—no fancy mixers or piping bags. The flour and butter come together in minutes, and the mousse layers just fold in like you’re making pancakes. Honestly, the hardest part is waiting for it to chill.
- Rich Without Guilt: That dark chocolate and sugar combo? It’s like a hug for your taste buds, but the butter and eggs keep it light enough to eat the whole thing. I’ll be real: my kids think it’s "fancy dessert," but it’s really just a smart use of pantry staples.
- Party in a Box: Between us, this is my go-to for birthdays, book club nights, or when I just need a reason to turn on the oven. The layers look impressive, but the prep is so simple you could pull it off even if you’re hosting last-minute. (Yes, even on a Tuesday night.)
- Leftovers That Win: The cake actually tastes better the next day—seriously. I’ve sent slices to work with my husband, and they’ve come back begging for the recipe. Plus, it’s budget-friendly: a box of chocolate chips and a few eggs stretch this dessert way further than store-bought.
Step-by-step instructions for chocolate layered mousse cake
Here's how to build the perfect balance of rich fudgy layers and light airy mousse—every step matters.
Bake the Chocolate Cake Layers
Preheat your oven to 350°F and grease two 8-inch round cake pans, lining the bottoms with parchment paper. In a large bowl, cream together the 1 cup unsalted butter and 2 cups granulated sugar on medium speed until light and fluffy—this should take about 3-4 minutes. The mixture will nearly double in volume and turn pale.
Add the 4 whole large eggs, one at a time, mixing well after each addition. Stir in the 1 tbsp espresso powder, 1 tbsp vanilla extract, and 0.5 tsp salt. In a separate bowl, whisk together the 1.5 cups all-purpose flour and 1.5 tsp baking powder, then sift this dry mixture into the wet ingredients. Fold just until combined—don't overmix, or your layers will be dense.
Divide the batter evenly between the prepared pans. Bake for 25-30 minutes, or until a toothpick inserted into the center comes out clean. Let the cakes cool in the pans for 10 minutes, then transfer to a wire rack to cool completely. Once fully cooled, level the tops if needed and trim any domed edges for even layers.
Prepare the Chocolate Ganache
Place the 1.5 cups dark chocolate chips in a heatproof bowl set over a saucepan of simmering water. Stir occasionally until the chocolate is fully melted and smooth, then remove from heat. Whisk in the 0.5 cup high-quality cocoa powder and let the mixture cool slightly—it should thicken but still be pourable. This ganache will create that decadent fudgy base between your cake layers.
While the ganache cools, whip the 3 cups heavy cream in a separate bowl until it forms soft peaks. Gently fold the whipped cream into the cooled ganache until fully combined, creating a thick, glossy filling. Taste and adjust sweetness with additional powdered sugar if needed—this ganache should be rich but not overly sweet.
Assemble the Cake Layers
Place the first cake layer on a serving plate or cake stand. Spread an even layer of the chocolate ganache over the top, leaving a ¼-inch border around the edges. This prevents the filling from oozing out when you add the next layer. Repeat with the second cake layer, pressing down gently to create a seamless structure.
For the mousse topping, whip the 1.5 cups powdered sugar with the remaining 1 cup heavy cream (reserved from the ganache preparation) until light and fluffy. Spread this airy mousse over the top of the cake, then swirl gently with a knife to create those signature marbled patterns. Chill the assembled cake in the refrigerator for at least 4 hours, or preferably overnight, to let the flavors meld and the layers set properly.
Garnish and Serve
Before serving, spread the 0.5 cup raspberry sauce over the top of the chilled cake in a thin, even layer. This adds a bright contrast to the deep chocolate flavors and creates a stunning visual finish. For extra flair, pipe additional whipped cream around the edges or dust with cocoa powder. Let the sauce set for 10-15 minutes before slicing to ensure clean, elegant layers.
The cake will keep well in the refrigerator for up to 3 days, though I promise it won't last that long. Each slice should reveal that perfect contrast—dense, fudgy cake layers separated by light, airy mousse, with just a hint of tart raspberry to balance the richness. Serve with a dollop of whipped cream if you're feeling extra indulgent!
Pro Tips For Making Chocolate Layered Mousse Cake
- Temper Your Chocolate: Melt those dark chocolate chips slowly over a double boiler—direct heat makes them seize like a stubborn toddler. Once melted, let the mixture cool to room temp before incorporating eggs, or you’ll end up with scrambled eggs in your mousse.
- Whip Eggs Separately: Beat the egg yolks and whites independently first, then merge them gently. Yolks handle the sugar, whites get fluffy—mix them together too soon, and you’ll fight for air like a deflating balloon.
- Chill the Cake Layers: Pop the cake layers in the fridge for at least 15 minutes before adding mousse. Warm layers turn into a soggy mess, and nobody wants a chocolate puddle instead of a layered masterpiece.
- Use Room-Temp Butter: Take that butter out of the fridge an hour before baking—cold butter means uneven layers and a cake that fights you every step. Soft butter? Smooth layers. Fight me.
Wine and beer pairings for this chocolate layered mousse cake
Rich Red Wine
For this decadent chocolate cake, a bold red wine like Cabernet Sauvignon or Malbec is my go-to choice. The tannins in these wines complement the deep chocolate flavor beautifully, creating a perfect harmony on your palate.
A 2018 Argentine Malbec from Mendoza has just the right balance of fruitiness and earthiness to stand up to the richness. 🍷
Port or Ruby Port
If you prefer something sweeter, Port wine is an excellent pairing. The ruby Port from Taylor's or Graham's adds a fruity, slightly sweet contrast that enhances the chocolate's depth without overpowering it.
Serve it slightly chilled to let the flavors shine. I like to pour a small glass alongside each slice for an elegant touch.
Dark Chocolate Liqueur
For a non-alcoholic option, Godiva Chocolate Liqueur or Créme de Cacao adds a luxurious twist. Drizzle a small amount over the cake or add it to coffee for a dessert-inspired beverage. This works especially well if you're serving the cake as part of a dessert course with coffee or tea.
Beer Pairing
A dark Belgian ale like Rodenbach or a stout such as Guinness can be a surprising but delightful match. The roasted malt flavors in these beers echo the chocolate's depth while providing a malty contrast.
For a lighter option, a chocolate stout like Founders Kentucky Breakfast Stout is a perfect match.
Espresso Martini
Since the cake includes espresso powder, an espresso martini makes a sophisticated pairing. The bitterness of the espresso cuts through the sweetness, while the vodka adds a clean finish.
Shake 2 oz vodka, 1 oz coffee liqueur, and 1 oz freshly brewed espresso with ice, then strain into a chilled glass. Garnish with a coffee bean for an extra touch. ✨
Coffee Pairing
A strong, dark roast coffee like Blue Bottle or Intelligentsia Black Cat enhances the chocolate flavors without competing. The natural oils in the coffee beans create a rich mouthfeel that complements the cake's texture. Serve it black or with a splash of heavy cream for a decadent experience.
Nutrition facts
Frequently asked questions
Can I make this cake without eggs for a vegan version?
Yes! Replace the 4 eggs with 4 tablespoons aquafaba (chickpea brine) whipped to stiff peaks, or use 1 cup applesauce mixed with 1 teaspoon baking soda for moisture. For the mousse, use coconut cream whipped with 1 teaspoon agar-agar to stabilize. The texture will be slightly different but still delicious.
Why does my mousse turn grainy when chilled?
Graininess usually happens when the mousse isn't whipped enough or the cream wasn't cold enough. Always chill your mixing bowls and beaters first, and whip the cream to stiff peaks—it should hold its shape when the whisk is lifted. If it still separates, try adding 1 extra tablespoon powdered sugar to stabilize it.
How do I prevent the cake layers from falling apart when slicing?
Let the assembled cake chill for the full 4 hours (overnight is best). Before slicing, run a thin knife under hot water and wipe it dry—this creates a clean cut without tearing. Also, ensure your ganache is thick enough to hold the layers together. If it's too runny, chill it for 10 minutes before spreading.
Can I make this cake ahead of time?
Assemble the cake 1 day in advance and store it in the fridge. The flavors deepen over time, and the mousse stays creamy. For longer storage, freeze the assembled cake (unfrosted) for up to 2 months. Thaw it overnight in the fridge before serving.
What’s the best way to level uneven cake layers?
Use a serrated knife or a cake leveler for clean cuts. If your knife isn’t sharp, dip it in hot water between slices to keep it smooth. For extra precision, place a thin plate on top of the cake and slice just above it—this creates a straight edge every time.