Desserts
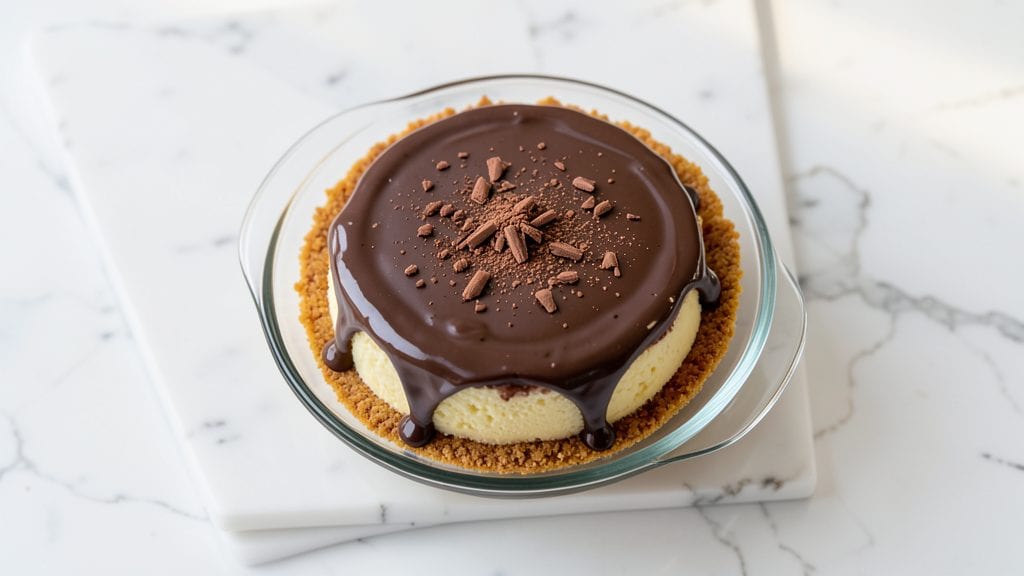
This Cheesecake Factory Hershey's Chocolate Cheesecake recipe delivers the rich, fudgy layers and velvety ganache swirls that make it legendary.
The secret lies in a perfectly balanced crust—whether you choose classic graham crackers or chocolate cookies—and a filling so dense with Hershey's chocolate that every bite tastes like a decadent hug.
I've refined this recipe over years to ensure the texture is flawless: a silky, crack-free center with just the right resistance when sliced.
The crust starts with a precise blend of crumbs and butter, pressed into the pan for an even base that won't crumble during baking. Meanwhile, the filling combines cream cheese, Hershey's chocolate, and a touch of sour cream for that signature smoothness.
A water bath guarantees even heat distribution, preventing cracks while developing that signature fudgy texture. The ganache swirls—made with melted chocolate and heavy cream—add visual drama and a molten contrast that elevates every slice.
What you'll end up with is a cheesecake that's restaurant-quality at home: dense enough to hold its shape but tender enough to melt in your mouth. The Hershey's chocolate shines through in every forkful, while the ganache swirls create pockets of rich, silky indulgence.
This isn't just dessert—it's an experience, and one that's surprisingly achievable with the right technique and patience. Let's get started on recreating that iconic flavor.
For those who prefer lighter options, a graham cracker crust and reduced-fat cream cheese can keep the richness while cutting calories. The recipe also scales beautifully—whether you're feeding a crowd or treating yourself to a single slice.
Each step is designed to ensure success, from the water bath to the gradual cooling process that prevents cracks. Trust the method, and you'll have a cheesecake that rivals the original every time.
Ingredients for cheesecake factory hershey's chocolate cheesecake
Twelve ingredients transform into a restaurant-worthy Hershey's chocolate cheesecake with fudgy layers and silky swirls.
| Ingredient | Amount | Notes |
|---|---|---|
| Graham Cracker Crumbs 🍪 | 2 ½ cups | Finely crushed, no large pieces |
| Unsalted Butter 🧈 | 1 cup | Cold and cubed for crust |
| Hershey's Special Dark Chocolate Bars 🍫 | 12 oz | Semi-sweet for optimal melt |
| Full-Fat Cream Cheese 🧀 | 32 oz | Room temperature for blending |
| Granulated Sugar 🍚 | 2 cups | Superfine preferred for smoothness |
| Sour Cream 🥛 | 1 cup | Full-fat for richness |
| Vanilla Extract 🌿 | 2 tsp | Pure Madagascar preferred |
| Large Eggs 🥚 | 4 whole | Room temperature for even baking |
| Heavy Cream 🥛 | 1 cup | 36% fat for ganache stability |
| Diamond Crystal Kosher Salt 🧂 | ½ tsp | Fine grain for delicate seasoning |
| Cornstarch 🌾 | 2 tbsp | For silky texture in filling |
| Heavy Whipping Cream 🥛 | 1 cup | Cold for ganache swirls |
The Hershey's Special Dark chocolate bars are non-negotiable for authentic flavor—avoid imitation brands like Hershey's Blend, which lacks the depth. For the crust, Nabisco Honey Maid graham crackers yield the best texture, but any sturdy graham works. The cream cheese should be full-fat Philadelphia brand for optimal richness; reduced-fat versions compromise the signature melt. When selecting butter, Plugrá or Land O'Lakes unsalted are ideal for their high fat content and neutral flavor. For the ganache, heavy cream with 36% fat or higher ensures proper setting without graininess—store brands often fall short here.
No Hershey's Special Dark bars? Ghirardelli Dark Chocolate Squares provide a close alternative, though the flavor profile differs slightly. Substituting cream cheese for mascarpone at a 1:1 ratio adds luxurious texture but requires adjusting the sour cream to ½ cup. For a lighter option, low-fat cream cheese plus 2 tbsp sour cream maintains structure while reducing calories. The cornstarch is critical for preventing cracks—Arrowhead brand is finest and most effective. When melting chocolate, chop it into even ½-inch pieces for consistent melting; microwave in 30-second bursts to avoid burning. The ganache swirls require patience—cool the melted chocolate to 100°F before combining with cream to prevent premature seizing.
Store the crust mixture in an airtight container with parchment between layers for up to 2 days in the refrigerator. The unbaked filling can be refrigerated for 12 hours before baking, though room temperature is ideal. Once baked, cheesecakes develop optimal texture after 24 hours of refrigeration—the filling firms while remaining tender. For serving, transfer to the freezer for 15 minutes to set the ganache swirls before slicing. Leftovers keep for 5 days refrigerated, but the ganache may separate; simply reheat gently to restore silkiness. For gifting, wrap individual slices in parchment and secure with twine for transport.
Why You'll Love This Recipe
- No-Fuss Layers: I swear by this crust—just melt butter, mix in graham cracker crumbs, and press. No rolling, no fuss, just that perfect buttery crunch under every bite.
- Melty Chocolate Magic: That Hershey’s Special Dark folded into the cream cheese? It’s the secret weapon. One forkful and you’re hooked—rich, fudgy, with just enough sweetness to balance the tang.
- Party-Ready in a Snap: Between us, this is my go-to for gatherings. It’s impressive enough for guests but zero stress—make it ahead, slice it up, and watch it disappear. (Yes, even on a Tuesday night.)
Step-by-step instructions for cheesecake factory Hershey's chocolate cheesecake
Master the art of this iconic dessert with precise technique and professional timing.
Prepare the Crust with Precision
Preheat your oven to 325°F and position a rack in the lower third. In a large bowl, combine the 2.5 cups graham cracker crumbs with the 1 cup cold, cubed unsalted butter. Use your fingers to work the butter into the crumbs until the mixture resembles wet sand with no dry patches remaining.
Press this mixture firmly and evenly into a 10-inch springform pan, creating an even base. Use the bottom of a glass to compact the crust in concentric circles. Bake for 12-15 minutes until the edges are light golden brown and the crust feels set when gently pressed. This foundation must be completely dry to prevent a soggy bottom in your finished cheesecake.
Create the Chocolate Ganache Swirl
While the crust bakes, prepare the ganache by finely chopping the 12 oz Hershey's Special Dark Chocolate Bars into small pieces. In a heatproof bowl set over a saucepan of simmering water, combine the chocolate with the 1 cup heavy cream. Stir gently until the mixture reaches 120°F and the chocolate melts completely, creating a glossy, fluid ganache. Remove from heat and let cool to 100°F—it should be thick enough to hold swirls but still pourable.
In a separate bowl, whip the 1 cup heavy whipping cream to stiff peaks. Gently fold one-third of the whipped cream into the cooled ganache to lighten it, then set aside. This combination will create those signature swirls while maintaining the rich chocolate flavor that defines this dessert.
Blend the Cheesecake Batter
Reduce oven temperature to 300°F and let it stabilize. In the bowl of a stand mixer fitted with the paddle attachment, beat the 32 oz room-temperature full-fat cream cheese and 2 cups granulated sugar on medium speed for 3-4 minutes until completely smooth and pale. Add the 1 cup sour cream, 2 tsp vanilla extract, and 0.5 tsp diamond crystal kosher salt, mixing until fully incorporated.
Add the 4 whole large eggs, one at a time, mixing just until each is fully incorporated after addition. Scrape down the sides of the bowl as needed. In a small bowl, whisk together the 2 tbsp cornstarch with 2 tablespoons cold water to create a slurry. With the mixer running on low speed, slowly pour in the slurry, mixing until just combined. This step ensures a silky texture without graininess.
Assemble and Bake the Cheesecake
Pour half of the cheesecake batter over the cooled crust. Using a spatula, spread it evenly to create a thin layer. Dollop the prepared ganache mixture over this layer, then carefully swirl it with the spatula to create marbled patterns. Pour the remaining batter over the ganache, gently swirling with the spatula to create additional marbling while maintaining an even distribution.
Bake for 50-60 minutes until the edges are set and the center still jiggles slightly when shaken. The cheesecake should pull away slightly from the edges of the pan. Turn off the oven, crack the door open, and let the cheesecake cool within for 1 hour. This gradual cooling prevents cracking and allows the center to set properly. Remove from the oven and cool completely at room temperature before refrigerating.
Chill and Serve with Confidence
Transfer the springform pan to the refrigerator and chill for at least 8 hours, preferably overnight. This extended chilling period allows the flavors to meld and the texture to firm up perfectly. When ready to serve, run a thin knife around the edge of the pan to loosen any potential sticking, then release the springform.
Slice with a warm, clean knife dipped in hot water and wiped dry between each cut. Each piece should reveal those signature chocolate swirls throughout a creamy, dense texture with a crisp graham cracker crust. Serve at room temperature for the optimal balance of texture and flavor.
Pro Tips For Making Cheesecake Factory Hershey'S Chocolate Cheesecake
- MELT CHOCOLATE SLOW: I learned this the hard way—dumping chopped Hershey’s bars straight into the cream cheese mixture makes clumps that ruin the texture. Instead, melt the chocolate first in a double boiler (or 30-second bursts in the microwave, stirring like your life depends on it), then let it cool slightly before mixing. The goal? A smooth, velvety batter that doesn’t fight you when you bake it.
- CHILL CREAM CHEESE FIRST: Full-fat cream cheese is stubborn when soft, and forcing it through a mixer with lumps leads to grainy cheesecake. Pop the blocks in the fridge for 10–15 minutes before beating—just enough to make them pliable, not rock-hard. This isn’t just about ease; it’s the difference between a silky filling and one that feels like it’s got tiny sandpaper bits.
- PRESS CRUST FIRM: Skimping on pressing the graham cracker crust into the pan means it’ll expand, crack, and turn to mush when you cut into it. Use your palms to really pack it down—think of it like tamping coffee grounds. A damp paper towel pressed over the crust before adding the filling also helps it stay put. (Yes, even if you’re impatient like me.)
- BAKE LOW AND SLOW: This isn’t a race. Bake the cheesecake at 325°F (not 350°F) and resist the urge to peek or open the oven door early. The center should jiggle barely when shaken—like a wobbly Jell-O, not a liquid. Rushing it leads to a dense, undercooked center that’ll either stay gummy or sink later. Trust the thermometer: 150°F internal temp is your friend.
Essential equipment for this recipe
Springform Pan
The 10-inch springform pan is non-negotiable for this recipe—it distributes heat evenly and allows for easy release after baking. I recommend the Nordic Ware Natural Aluminum pan for its superior heat conduction and non-stick properties.
If you don’t own one, a high-quality stainless steel pan with a removable bottom works too, though aluminum remains ideal. Avoid dark-colored pans, as they absorb heat unevenly and can cause the bottom crust to overbrown. 🧊
Stand Mixer
A stand mixer with a paddle attachment is essential for achieving that silky, crack-free texture. I use my KitchenAid Artisan Series for its powerful motor and durable construction, but any 500-watt mixer (like the Cuisinart SM-50) will work.
If you’re mixing by hand, be prepared for 10-15 minutes of vigorous stirring—the filling must be completely smooth to prevent graininess. For the ganache, a hand mixer suffices, but a stand mixer’s whisk attachment speeds up whipping the heavy cream to stiff peaks. 💪
Water Bath Setup
This recipe requires a water bath to prevent cracks and ensure even baking. You’ll need a large roasting pan or deep baking sheet that can accommodate your springform pan.
Line the bottom with a towel or aluminum foil to catch any water spills, then fill the pan with hot water (about 2 inches deep) before placing the cheesecake inside. I use a Le Creuset stoneware roasting pan for its durability and even heat distribution.
The water should reach midway up the sides of the springform pan. 🌊
Precision Tools
Invest in a digital kitchen scale for accurate measurements—especially for the cream cheese and chocolate. I swear by the OXO Good Grips scale for its readability and durability.
A spatula with a flexible head (like the Silpat-coated one from Amazon) is perfect for spreading the batter and creating those signature swirls. For the crust, a glass measuring cup works best for pressing it evenly.
Don’t skip the parchment paper—it’s a lifesaver when lining the springform pan for easy release. ✨
Thermometer
A candy or instant-read thermometer is critical for monitoring the ganache and ensuring it reaches the perfect 120°F before cooling to 100°F. I use the Thermoworks Thermapen One for its speed and accuracy, but even a budget-friendly Taylor Precision thermometer works.
For the oven, a thermometer probe (like the Meater Plus) helps maintain the 300°F temperature without fluctuations. Precise temperature control is the key to avoiding cracks and achieving that silky texture. 🌡️
Optional Upgrades
For a pro-level finish, consider a cheesecake cooling rack (like the Wilton Adjustable Rack) to elevate the pan after baking, allowing air to circulate and preventing condensation. A laser-level tool (such as the McElroy Level & Straight) ensures your crust is perfectly even before baking.
If you love presentation, a ceramic serving plate (like the Corelle Stoneware) keeps the cheesecake at the ideal serving temperature while showcasing the ganache swirls beautifully. 💫
Nutrition facts
Frequently asked questions
Can I make this Hershey's chocolate cheesecake without a water bath?
While possible, using a water bath is highly recommended to prevent cracks and ensure even baking. Without it, the cheesecake may develop surface cracks or bake unevenly. If you must skip the water bath, reduce the oven temperature to 275°F and bake for 10-15 minutes longer, checking frequently for doneness. The texture won't be as perfect, but it'll still be delicious.
Why does my Hershey's chocolate cheesecake have cracks?
Cracks typically occur from temperature fluctuations, overmixing, or opening the oven too soon. To prevent them: avoid overmixing the batter, use a water bath, and let the cheesecake cool gradually in the oven after baking. If cracks appear, cover them with a thin layer of melted chocolate or whipped cream before chilling.
How do I store and serve leftover Hershey's chocolate cheesecake?
Store leftovers in an airtight container in the refrigerator for up to 5 days. For serving, let slices sit at room temperature for 10-15 minutes to soften the ganache swirls. Reheat individual slices in the microwave for 5-10 seconds if the ganache has separated. Always use a warm knife for clean cuts.
Can I substitute Hershey's chocolate with another brand?
For the best results, use Hershey's Special Dark Chocolate Bars—they provide the authentic flavor and melt properties. As a substitute, Ghirardelli Dark Chocolate Squares work well, though the flavor profile will differ slightly. Avoid milk chocolate or imitation brands, as they lack the depth and richness of semi-sweet chocolate.
Is this recipe suitable for a vegan diet?
This classic recipe isn't vegan, but you can adapt it with vegan cream cheese, coconut cream, and aquafaba for eggs. Replace graham crackers with a vegan cookie crust and use dairy-free chocolate. The texture will differ, but it can still be delicious. For best results, follow a dedicated vegan cheesecake recipe instead.