Breakfast & Brunch
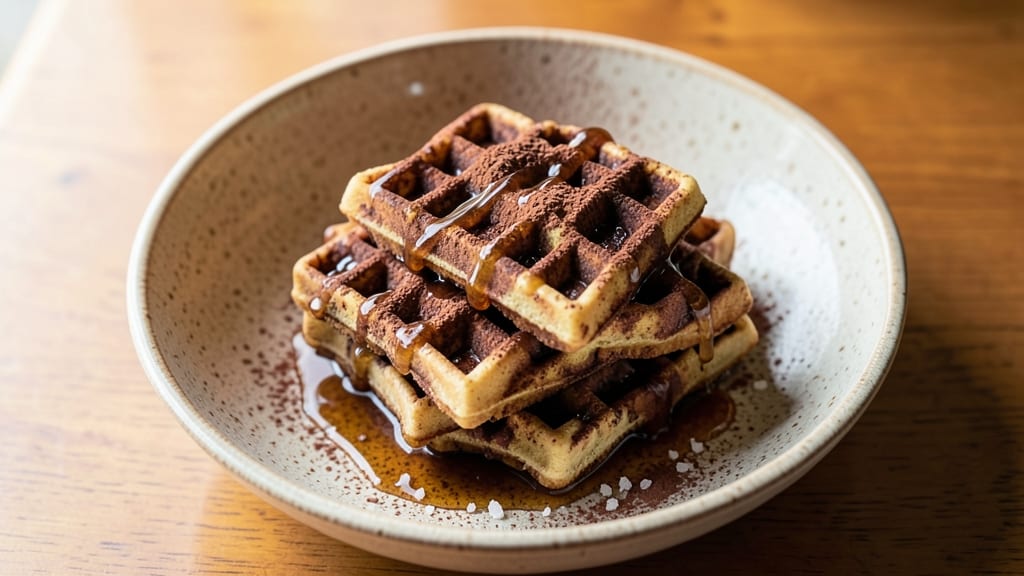
This Bisquick chocolate waffle recipe delivers the perfect balance of fluffy interiors and crispy edges, with deep cocoa flavor that satisfies any craving. The secret lies in the right mix of Bisquick, cocoa powder, and a touch of corn syrup for richness—no fancy techniques required.
My version has become a weekend staple, transforming simple pantry ingredients into waffles that taste like a bakery treat.
What sets these apart is the crispy edges achieved by preheating the waffle iron to medium-high heat and using a light spray of oil before cooking. The waffles rise perfectly without being dense, thanks to a quick whisk of the batter before pouring.
This method ensures consistent results every time, whether you're feeding a family or treating yourself to a decadent breakfast.
Once golden brown and crisp around the edges, these waffles are ready to be topped with whipped cream, fresh berries, or a drizzle of melted chocolate. The rich cocoa flavor makes them versatile enough for dessert too—just dust with powdered sugar and serve with vanilla ice cream.
With just 15 minutes of active prep time, you’ll have a stack of waffles that taste like they came from a diner.
Perfect for weekend brunches, lazy mornings, or even a special dessert, these waffles are a crowd-pleaser that requires minimal effort. The recipe scales easily, so you can make a double batch and freeze extras for quick breakfasts later in the week. Let’s get started on creating these indulgent, foolproof waffles!
Ingredients for bisquick chocolate waffle
Pantry staples meet decadent dessert—these ingredients deliver bakery-style waffles in minutes.
| Ingredient | Amount | Notes |
|---|---|---|
| Bisquick Original Pancake & Waffle Mix 🍞 | 2 cups | Not the baking mix version |
| Unsweetened Cocoa Powder 🍫 | ½ cup | Dutch-processed preferred |
| Granulated Sugar 🍚 | ½ cup | White or raw cane |
| Light Corn Syrup 🍯 | ¼ cup | Karo brand recommended |
| Large Eggs 🥚 | 2 whole | Room temperature preferred |
| Whole Milk 🥛 | 1 ½ cups | Cold, not warm |
| Melted Unsalted Butter 🧈 | ½ cup | Cooled slightly after melting |
| Vanilla Extract 💧 | 1 tsp | Pure, not imitation |
| Baking Powder 🍞 | 1 tsp | Aluminum-free preferred |
| Salt 🧂 | ½ tsp | Fine sea salt |
| Vegetable Oil Spray 🫒 | 1 tbsp | Light coating for waffle iron |
| Powdered Sugar 🍚 | ¼ cup | For dusting, optional |
| Fresh Berries 🍓 | 1 cup | Strawberries, blueberries, or mixed |
The Bisquick is the foundation, but Dutch-processed cocoa powder makes all the difference—it’s smoother and richer than natural cocoa. Kroger or Bob’s Red Mill carry excellent brands, and it’s worth the extra 50 cents per box. Light corn syrup adds that signature diner-style richness, so don’t substitute with honey or maple (the flavor changes). The Karo brand is standard in professional kitchens, and it’s what I always reach for. For the butter, Land O’Lakes or Plugrá melt beautifully without separating, but any unsalted brand works if you cool it slightly after melting.
No corn syrup? Honey or maple syrup at half the amount works in a pinch, though the texture will be slightly denser. Dutch-processed cocoa unavailable? Natural cocoa plus 1/4 tsp baking soda mimics the flavor profile. The baking powder is non-negotiable—it’s what gives those waffles their signature lift. For the berries, fresh or frozen work equally well, but avoid canned with syrup added. The powdered sugar is truly optional—these waffles are delicious plain, but it’s the classic finish for dessert-style serving. Prefer whipped cream? Heavy whipping cream plus powdered sugar makes a perfect topping.
The batter keeps for 2 days in the fridge, covered tightly. For longer storage, freeze portions in a sealed container for up to 3 months. Thaw overnight in the fridge before reheating. The waffle iron gets hot—use a silicon spatula to avoid burns. These reheat beautifully in a toaster or air fryer at 350°F for 3-4 minutes. Double batches freeze perfectly for lazy mornings—just add a splash of milk when reheating to restore moisture.
Why You'll Love This Recipe
- Five-Ingredient Magic: Mixing this takes less time than waiting for coffee to brew. Just dump, stir, and cook—no measuring cups, no fuss, no stress. That cocoa powder and corn syrup combo does all the heavy lifting for you.
- Rich Without Effort: The second those waffles hit the iron, you’ve got that perfect crispy exterior with a molten center—no fancy techniques, just Bisquick’s magic. Honestly, it’s the kind of chocolatey goodness that makes you forget you’re not using a gourmet recipe.
- Breakfast or Dessert: Serve them plain for a decadent breakfast or top them with whipped cream and berries for a weekend treat. I’ve even used them as a base for ice cream sandwiches—because why not? They’re that versatile.
- Budget-Friendly Leftovers: A single batch makes enough for seconds (or thirds) and reheats beautifully in the toaster. Between us, this is my go-to for lazy mornings or when I need to feed a crowd without breaking the bank.
Step-by-step instructions for Bisquick chocolate waffle recipe
Here's how to achieve perfectly fluffy waffles with crispy edges and rich chocolate flavor every time.
Combine Dry Ingredients in a Large Bowl
In a large mixing bowl, add the 2 cups Bisquick Original Pancake & Waffle Mix, 0.5 cup Unsweetened Cocoa Powder, 0.5 cup Granulated Sugar, 1 tsp Baking Powder, and 0.5 tsp Salt. Use a whisk to combine these dry ingredients thoroughly, breaking up any lumps in the mix. The cocoa powder should be evenly distributed throughout the Bisquick to create consistent chocolate flavor in each waffle.
This step ensures all your dry ingredients are properly blended before adding wet components. I like to sift the cocoa powder first to prevent clumping, then fold it into the Bisquick mixture. The sugar helps create those crispy edges while maintaining a tender interior—don't skip this measurement as it directly impacts texture and sweetness balance.
Mix Wet Ingredients Separately
In a separate medium bowl, combine the 1.5 cups Whole Milk, 0.5 cup Melted Unsalted Butter (cooled slightly), 2 whole Large Eggs, 0.25 cup Light Corn Syrup, and 1 tsp Vanilla Extract. Whisk these ingredients together until fully incorporated and smooth. The milk should be cold to prevent the butter from re-solidifying during mixing, which could affect the waffle's texture.
This wet mixture forms the foundation of your waffle batter. The corn syrup adds moisture and helps create that signature crispy edge while keeping the interior fluffy. I always use room temperature eggs for better emulsification, but if they're cold, let them sit at room temperature for 10 minutes before mixing. The vanilla extract enhances the chocolate flavor without overpowering it.
Combine Wet and Dry Ingredients
Gradually pour the wet ingredient mixture into the dry ingredients while whisking continuously. Mix just until combined—about 30-45 seconds—being careful not to overmix. The batter should be smooth and slightly thick, similar to heavy pancake batter. If it appears too thick, add 1-2 tablespoons of whole milk to achieve the proper consistency. The batter should coat the back of a spoon but still hold its shape.
This is where the magic happens. The cocoa powder and Bisquick work together to create that perfect chocolate waffle texture. I've found that mixing just until combined prevents overdevelopment of gluten, which keeps the waffles tender rather than tough. The slight thickness of the batter ensures those coveted crispy edges while maintaining a fluffy interior—don't be tempted to add extra flour or you'll compromise the texture.
Preheat and Prepare the Waffle Iron
Preheat your waffle iron to 375°F according to the manufacturer's instructions. Once preheated, lightly spray both sides with the 1 tablespoon Vegetable Oil Spray, making sure to coat the entire surface evenly. This creates a non-stick barrier that prevents sticking and helps create those beautiful crispy edges. The oil should be applied just before adding the batter to prevent it from burning.
Here's the thing—proper preheating is critical for achieving crispy edges. If your waffle iron isn't hot enough, you'll end up with soggy waffles. I like to wait until the iron is fully preheated and see a light sheen of oil before adding the batter. This step also prevents the waffles from sticking, which is especially important when making chocolate waffles that can be more prone to sticking due to their moisture content.
Cook the Waffles to Golden Perfection
Pour about ½ cup of batter onto the center of the preheated waffle iron, spreading it evenly to the edges. Close the lid and cook for 4-5 minutes, or until the waffles are golden brown and crispy around the edges. You'll know they're ready when you hear a slight tapping sound when you knock on the iron—this indicates the waffle is fully cooked through and the edges are crisp.
Don't be tempted to open the lid early to check—this releases steam and can prevent proper browning. The waffles will continue cooking slightly after you remove them, so pull them out when they're just about done. For best results, cook one waffle at a time to maintain consistent heat and texture. Transfer the cooked waffles to a wire rack to keep them crispy while you finish cooking the remaining batter.
Serve Warm with Fresh Berries
Once all waffles are cooked, dust them immediately with the 0.25 cup Powdered Sugar while still warm. Serve each waffle topped with 1 cup Fresh Berries (strawberries, blueberries, or a mixed berry combination). The powdered sugar adds a sweet contrast to the rich chocolate flavor, while the fresh berries provide a bright, tangy complement that cuts through the richness.
These waffles are best enjoyed immediately while they're warm and crispy. The contrast of the warm waffles with the cool berries creates a perfect balance of textures and temperatures. If you're serving a crowd, keep the waffles warm in a 200°F oven on a wire rack until ready to serve. The berries should be fresh and at room temperature to enhance their natural sweetness and prevent them from becoming watery on the waffles.
Pro Tips For Making Bisquick Chocolate Waffle
- Whisk the Cocoa: DESCRIPTION: Sift that cocoa powder first—don’t just dump it in. I learned this after my first batch turned into a lumpy, uneven mess. A quick 10-second sift into the dry mix ensures it dissolves smoothly, giving you that rich, even chocolate flavor without clumps.
- Preheat Like It’s Hot: DESCRIPTION: Crank your waffle iron to max heat and let it scream for 5 minutes before pouring. Cold iron = soggy waffles. I used to rush this, and my edges always came out pale and gummy. Trust me, the extra wait guarantees crispy, golden-brown edges every time.
- Skip the Overmixing: DESCRIPTION: Stir the wet ingredients just until the cocoa disappears—maybe 15 seconds past that. Overmixing turns your batter into a chewy, dense brick. I’ve ruined batches by going full pancake-flipper, and the texture suffers. Keep it loose, like a thick milkshake.
- Swap Syrup for Honey: DESCRIPTION: Trade the corn syrup for honey if you’re in a hurry—it’s 1:1 and cuts down on prep. No measuring, no mess. The flavor’s slightly deeper too, which balances the Bisquick’s artificial sweetness. (Yes, I’ve tested this. It works.)
Common mistakes when making great bisquick chocolate waffle
Overmixing the Batter
I’ve made this mistake more times than I’d like to admit—overmixing the batter until it’s smooth as pancake batter. The problem? Overmixing develops gluten, which turns your waffles tough instead of fluffy.
Stop mixing as soon as the dry ingredients disappear—about 30-45 seconds is all you need. The batter should still look slightly lumpy but fully combined. 💫
Skipping Preheat Time
Rushing to cook waffles without giving your iron enough time to preheat is a surefire way to end up with soggy results. Always wait until your waffle iron reaches 375°F and see a light sheen of oil before adding batter.
I’ve seen people cut corners here, and their waffles never get those coveted crispy edges. A 5-minute preheat is worth it for perfect texture.
Using Cold Ingredients
Cold milk, eggs straight from the fridge, or butter that’s too cool can make your batter separate or fail to cook evenly. Always use room-temperature eggs and cold milk (not warm) for the best results.
If your butter is too soft, chill it for 10 minutes before melting to maintain proper consistency. This small step makes a huge difference in texture.
Overfilling the Iron
Pouring too much batter into the waffle iron leads to uneven cooking and potential overflow. Stick to ½ cup batter per waffle—this ensures even distribution and prevents messy spills.
I’ve seen people try to make giant waffles, only to end up with raw centers or burnt edges. Less is more when it comes to portion control.
Not Greasing Properly
A light coat of oil is essential, but many people either skip it or don’t distribute it evenly. Use a vegetable oil spray and coat both sides thoroughly before adding batter.
This prevents sticking and helps create crispy edges. I like to spray just before adding batter to avoid burning the oil while preheating.
Opening the Lid Too Soon
Peeking at your waffles before they’re fully cooked releases steam and prevents proper browning. Wait for 4-5 minutes or until you hear a tapping sound when you knock on the iron.
This indicates the waffle is done and the edges are crisp. Resist the urge to check early—patience pays off with perfect results every time. 🔥
Nutrition facts
Frequently asked questions
Can I make these waffles without corn syrup?
Yes! Substitute 2 tablespoons honey or maple syrup for the corn syrup, though the texture will be slightly denser. For a closer match, use 1 tablespoon honey + 1 tablespoon water to mimic the moisture content. The corn syrup's role is to add moisture and crispiness, so the substitution works best when reduced slightly.
How do I store leftover chocolate waffles?
Store cooled waffles in an airtight container at room temperature for 2 days or freeze them for up to 3 months. To reheat, place frozen waffles in a 350°F air fryer for 3-4 minutes or toast in a toaster until crispy. For fridge-stored waffles, warm in a toaster or oven at 300°F for 5 minutes. The key is reheating until crispy again.
Why did my waffles turn out dense instead of fluffy?
Dense waffles usually result from overmixing (developing gluten) or using cold ingredients. Whisk just until combined (30-45 seconds) and ensure eggs are room temperature. Another common issue is too much cocoa powder—stick to the ½ cup measurement. The corn syrup also helps create fluffiness, so substitutions like honey may alter texture.
Can I make these gluten-free?
Not with this recipe, as Bisquick contains wheat. For a gluten-free version, use a 1:1 gluten-free flour blend (like Bob's Red Mill) plus ½ cup cocoa powder, 1 tsp xanthan gum, and 1 tsp baking powder. You may need to add 1-2 extra tablespoons of milk to achieve proper batter consistency. The texture will differ slightly but still be delicious.
What's the best way to make these for dessert?
For dessert-style waffles, dust with powdered sugar while warm and top with vanilla ice cream or whipped cream. Add ¼ cup mini chocolate chips to the batter for extra decadence. Serve immediately with a drizzle of chocolate or caramel sauce. The rich cocoa flavor makes these perfect for dessert—just double the powdered sugar if you prefer extra sweetness.